Runway End Light
The definitive visual marker identifying the end of the runway. Installed in a row across the runway end, these red lights provide pilots with a clear and unambiguous indication that the runway is ending, serving as a critical safety cue during takeoff and landing.
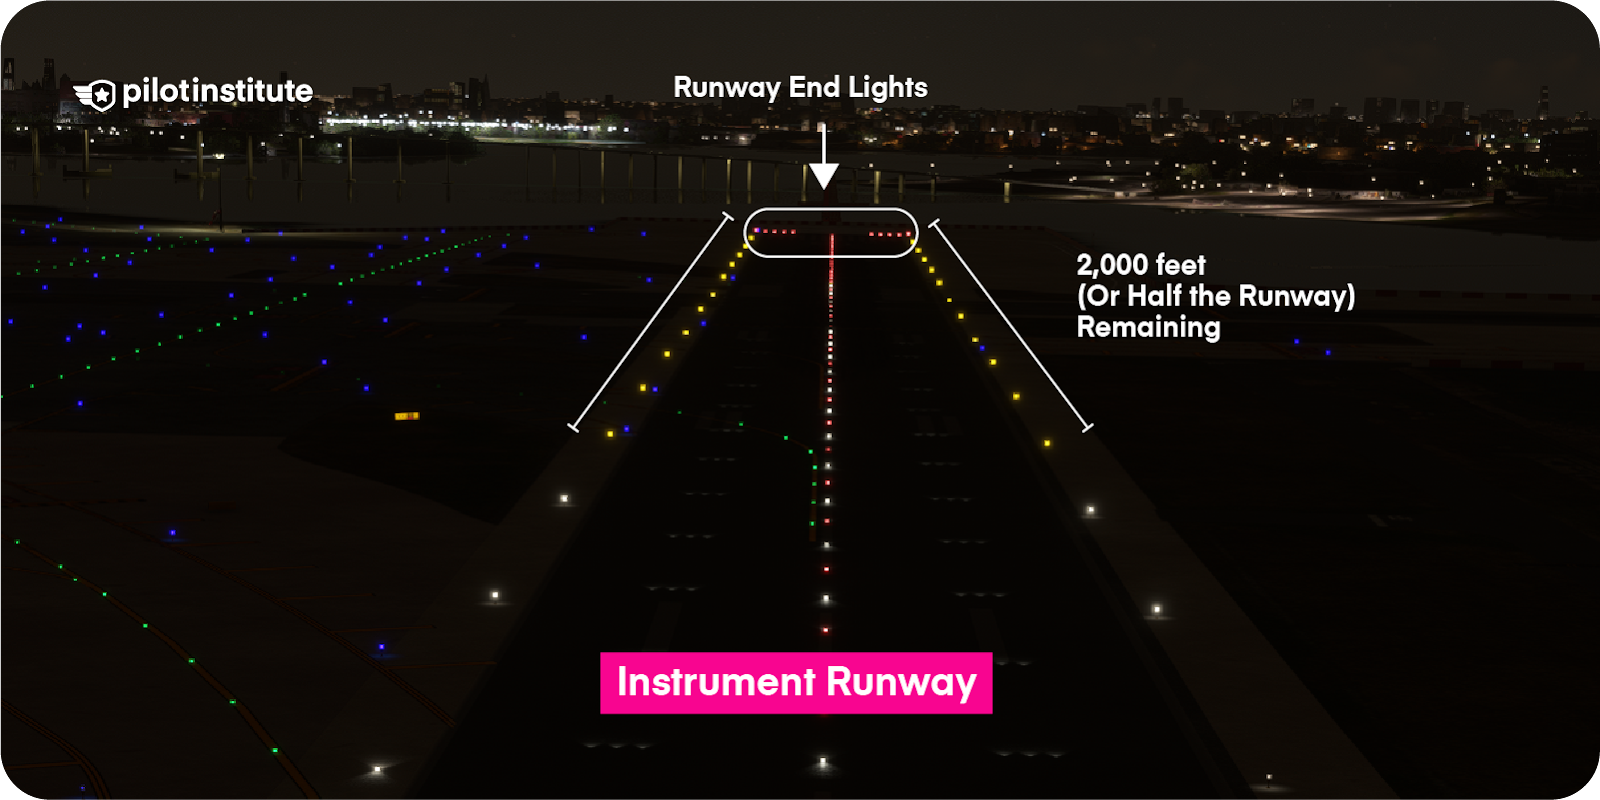
Image disclaimer: For identification and illustration only. It may show a product by another manufacturer and may not depict the exact item described; it is not a statement of any product’s quality, approval or performance. Third-party image and trademark rights belong to their owners. See full notice.
What Is It?
A Runway End Light is a red light fixture installed at the end of a runway. These lights are arranged in a single row extending across the full runway width, with the number of fixtures set by that width (spacing must not exceed 3 m, per ICAO Annex 14 / FAA AC 150/5345-46), and are uni-directional, projecting light only in the approach direction. The red colour signifies the end of the runway available for landing, distinguishing it from the green threshold lights at the opposite end. Runway end lights are a critical safety feature, alerting pilots that the runway surface is about to end and that they must either stop or go around.
Purpose & Function
The runway end light exists to give a pilot an unmistakable, unambiguous cue that usable runway is running out, so the decision to land, stop, or go around can be made with confidence rather than guesswork. Because the fixture is uni-directional and only visible to traffic approaching from the runway side, it cannot be mistaken for a threshold or edge light from the landing direction, and its red colour is reserved exclusively for this "end of pavement" warning across the entire airfield lighting system. This makes it a terminal safety reference during rollout after landing and a hard boundary marker during takeoff, particularly in low-visibility or night operations where the physical edge of the pavement is otherwise difficult to judge.
Where Is It Used?
Installed at the end of all paved runways that support night operations. The lights extend as a single row across the full runway width, on a line at right angles to the centreline, with spacing between adjacent lights not exceeding 3 metres; the outermost lights sit on, or up to about 3 metres outside, the runway edge to match the runway edge light line. Runway end lights are used on both precision and non-precision runways, and are also installed at the end of displaced thresholds where applicable. They work in conjunction with threshold lights to clearly define the runway limits.
Installation & Location
Fixtures are set out in a single row on (or just beyond) the physical end of the runway, square to the centreline, at the spacing dictated by runway width so no gap between adjacent lights exceeds the design maximum. Units are almost always inset (flush) fittings seated into an L-868 base can recessed into the pavement or paved shoulder, sealed against surface water and jet-blast debris, since the runway end typically falls within a frangibility-sensitive zone where elevated fixtures are avoided. Each base can is fed by armoured cable run in duct back to its isolating transformer, with the transformer housed in its own secondary base can to keep the series-circuit joint clear of standing water. The optical assembly is oriented uni-directionally toward the approach, so alignment is checked against the runway centreline survey during setting-out to confirm the beam is aimed correctly at arriving traffic. Where the runway end coincides with a displaced threshold, the row is positioned relative to the full pavement end rather than the displaced landing threshold, and coordinated with adjacent threshold and edge light circuits so the three systems read as one continuous boundary to the pilot.
How Does It Work?
Each runway end light is powered from the series circuit via an isolating transformer. The light projects a narrow, uni-directional beam towards the approaching aircraft, using a precision optical system with a reflector and prism. The red colour is achieved through a red filter or dichroic coating. The intensity is controlled by the CCR's current steps, with higher intensities used during low visibility operations. The lights are typically flush-mounted (inset) in the pavement, though elevated versions may be used in some configurations.
System Architecture & Control Logic
Runway end lights are not individually addressable — control is exercised at the loop level, and in most airfield electrical designs the end light row is wired into the same series circuit as the runway edge lights (and frequently the threshold lights too), so the entire runway edge lighting system switches and dims together as one. An Airfield Lighting Control and Monitoring System (ALCMS), operated by the tower or an automated visibility-linked routine, selects the required brightness step based on prevailing RVR, ATC instruction, or (at smaller aerodromes) pilot-controlled lighting input. This command is passed to the CCR, which regulates the shared loop to the corresponding fixed current. Every fixture on that loop, whether it is a runway end light, an edge light, or a threshold light, draws from the same current via its own isolating transformer and therefore burns at the same intensity simultaneously — the end light row cannot be commanded independently unless it has been isolated onto its own circuit at the design stage. Fault detection is likewise loop-based: the CCR continuously monitors loop voltage against the commanded current, and a voltage rise at constant current signals increased circuit impedance, typically an open-circuit lamp or a failed isolating transformer, which is reported to the ALCMS as a loop fault rather than pinpointed to an exact fixture without further sectionalised testing.
ALCMS → CCR → Shared Series Circuit Loop → Isolating Transformer → Runway End Light Fixture (with loop-level feedback)
Circuit & Beam Overview
Physical Construction
The fixture body is a die-cast aluminium alloy housing, anodised or powder-coated for corrosion resistance, with an internal reflector and baffle arrangement that restricts the beam to a uni-directional pattern facing the approach. The red colour is produced by a filtered lens or coloured LED array rather than a dyed housing, so output stays consistent as the fixture ages; the lens itself is toughened glass or high-strength polycarbonate, gasket-sealed with an O-ring to the housing for an IP67/IP68 rating. Since runway end lights sit within a frangibility-sensitive zone, the fixture is almost always an inset (flush) unit, seating into an L-868 base can recessed into the pavement with a wheel-load-rated top plate rather than mounting on a frangible coupling. Internal leads terminate at L-823 primary connectors, sealed for direct burial and continuous immersion, mating to the isolating transformer's secondary in an adjacent base can. Stainless-steel fasteners and a drainage path around the base can complete the assembly, keeping the connector joint clear of standing water.
Technical Parameters
| Parameter | Typical Value |
|---|---|
| Light Source | LED array or 45W / 65W halogen |
| Colour | Red (uni-directional, approach side) |
| Intensity Steps | 5-step (2.8A – 6.6A) CCR controlled |
| Beam Pattern | Uni-directional (3° vertical x 6° horizontal) |
| Spacing | ≤ 3 metres across runway width |
| Mounting Type | Flush-mounted (inset) or elevated |
| Isolating Transformer | 45W / 65W (6.6A series circuit) |
| Protection Class | IP67 / IP68 (submersible) |
Electrical Requirements
| Requirement | Typical Value |
|---|---|
| Circuit Type | Series circuit, constant current (CCR fed) |
| Rated Series Current | 6.6A (5-step: 2.8A / 3.4A / 4.1A / 5.2A / 6.6A) |
| Isolation | Via dedicated isolating transformer (45W/65W), not directly connected to series loop |
| Transformer Secondary | Matched to fixture wattage; sized to series circuit rating |
| Cable Type | L-824 single-conductor, direct-burial rated, 5kV or 600V per circuit design |
| Connector | L-823 primary connector, submersible-rated splice |
| Insulation Resistance | ≥ 50 MΩ (megger test, cable-to-ground) |
| Earthing/Grounding | Fixture body and base can bonded to airfield earth grid |
| Fault Protection | CCR-level ground fault and open-circuit detection |
| Power Source | CCR output, regulated per ICAO/FAA intensity step schedule |
Photometric Requirements
| Parameter | Typical Value |
|---|---|
| Main Beam Intensity (100%) | ≥ 2,000 cd (red) per ICAO Annex 14 / IEC 61827 |
| Intensity Steps (5-step) | 100% / 30% / 10% / 3% / 1% of rated peak intensity |
| Vertical Beam Spread | Main beam 2°–15° above horizontal (peak ~3°–4°), uni-directional |
| Horizontal Beam Spread | ± 5° to ± 7.5° either side of runway centreline plane |
| Isocandela Distribution | Per ICAO Annex 14 Attachment A / FAA AC 150/5345-46 figures |
| Chromaticity (Red) | Within ICAO Annex 14 red boundary (CIE coordinates) |
| Directionality | Visible from the approach side only; opaque/baffled to the departure side |
| Maintenance Factor | ≥ 50% of new-fixture intensity before replacement/cleaning is due |
| Intensity Tolerance | ± 25% of rated value at each CCR step (field measurement) |
| Test Method | Mobile photometric van/goniophotometer or fixed test bench per fixture |
Applicable Standards
ICAO Annex 14
Runway end light colour, spacing, and photometric requirements
FAA AC 150/5345-46
Specification for runway end lights
IEC 61827
Electrical and photometric performance for AGL luminaires
FAA AC 150/5345-53
Airport Lighting Equipment Certification Program
Installation Requirements
Base Can Excavation & Grade
CivilExcavate and compact the sub-grade to design depth before setting the L-867/L-868 base can, holding the can top flush and level within the runway end surface tolerance.
Drainage Provision
CivilProvide a weep hole or drainage path at the base can to prevent water pooling around the transformer and cable entry, especially in flush/inset installations.
Duct & Cable Route
ElectricalLay the series circuit duct/cable route to design depth and separation from other services, avoiding sharp bends that could stress the L-823 connector at final termination.
L-823 Connector Termination
ElectricalTerminate and seal the primary connector per manufacturer procedure, keeping the splice fully submersible-rated before backfill or reinstatement of the base can.
Isolating Transformer Matching
ElectricalConfirm the isolating transformer wattage and ratio match the fixture and the series circuit's rated current step before connection.
Frangible Coupling / Base Can Fixing
MechanicalTorque the frangible coupling or fixture fixing bolts to the specified value, checking the fitting shears as designed under lateral load and does not bind.
Orientation & Aim Setting
MechanicalSet the fixture's unidirectional aim square to the runway centreline against the design aiming diagram, keeping elevated units within the frangibility height limit.
Pre-Energisation Sign-off
DocumentationRecord base can position, cable route, connector seal, and torque values as-built before backfill, since these are not inspectable once the site is closed.
Testing & Commissioning
Insulation Resistance (Megger) Test
Pre-EnergisationMegger-test the isolating transformer and series loop before the circuit is energised, confirming insulation resistance clears the acceptable minimum ahead of backfill.
Loop Continuity & Resistance Test
Pre-EnergisationVerify series loop continuity end to end and record total loop resistance, ruling out open circuits or high-resistance splices before first energisation.
Primary/Secondary Voltage Verification
EnergisationWith the CCR energised, confirm secondary voltage at the L-823 connector matches the transformer's rated ratio at the commissioned current step.
Red Filter Colour & Intensity Test
Final AcceptanceVerify red chromaticity and beam intensity with a calibrated photometer against ICAO/FAA thresholds before handover.
CCR Brightness Step Response
EnergisationCycle the CCR through every intensity step and confirm the fixture responds correctly at each.
Fixture Alignment & Levelling Verification
Final AcceptanceConfirm fixture elevation and azimuth match the design aiming diagram so the runway-end indication is visible as intended.
Frangible Coupling & Mounting Verification
Pre-EnergisationConfirm the frangible coupling, base can depth, and fixture height meet as-built tolerances before the site is finally backfilled.
Documentation & As-Built Sign-off
Final AcceptanceRecord insulation, continuity, voltage, and photometric readings alongside as-built position in the commissioning dossier for handover.
Inspection & Maintenance
Photometric Intensity Check
AnnualVerify red beam intensity and chromaticity against ICAO / FAA thresholds using a calibrated photometer; degraded output usually points to filter fade or an aging lamp/LED source.
Red Filter & Lens Cleaning
QuarterlyWipe the red filter and lens free of rubber deposits, de-icing fluid residue, and film build-up so colour fidelity and output stay within spec.
Seal & Gasket Inspection
AnnualCheck top-cap O-rings and gaskets for cracking or compression set, and re-torque fasteners to spec to keep the fixture watertight.
Frangible Coupling Check
AnnualInspect elevated-fixture couplings for brittleness, corrosion, or shear fatigue and replace on schedule, particularly in high-impact or overrun zones.
Insulation Resistance Test
AnnualMegger-test the isolating transformer and series circuit to confirm insulation resistance stays above the minimum, flagging moisture ingress before it causes a series-circuit fault.
Alignment & Levelling
Semi-annualConfirm fixture aim and vertical/horizontal tilt remain within tolerance so the uni-directional beam stays correctly projected to the approach path.
Cable & Connector Inspection
AnnualExamine primary and secondary cable connections for corrosion or loose crimps, a common source of intermittent series-circuit faults.
Housing & Base Can Inspection
AnnualCheck the base can, mounting stake, and surrounding pavement for settlement, cracking, or debris that could affect frangibility or drainage.
Common Field Issues
Red Filter Degradation
The red filters in runway end lights are susceptible to UV degradation and thermal stress from halogen lamps. Over time, the colour can fade or shift toward orange, reducing the effectiveness of the visual cue. Regular photometric testing and filter replacement is essential.
Lens Contamination
Runway end lights are exposed to rubber deposits from aircraft, tyre debris, and de-icing fluids. Regular cleaning with approved solvents and soft brushes is required to maintain light output and colour fidelity.
Misalignment from Pavement Settlement
Pavement settlement can cause runway end lights to tilt, altering the beam pattern and reducing visibility on approach. Regular alignment checks using a digital level or specialized alignment jig are recommended.
Troubleshooting Guide
Single Fixture Dark, Rest of Circuit Normal
Entire Series Circuit Dark / CCR Will Not Regulate
CCR Trips on Overcurrent or Ground Fault
Red Colour Appears Faded, Pink, or Orange
Reduced or Uneven Light Output
Fixture Leaning, Loose, or Misaligned
Failure Modes & Root Causes
Lamp / LED Module Failure
Red Filter Fade / Chromaticity Shift
Isolating Transformer Winding Failure
L-823 Connector / Splice Degradation
Series Cable Insulation Breakdown
Lens Contamination
Frangible Coupling Fatigue / Fracture
CCR Regulation Fault
Base Can / Foundation Settlement
Safety & Operational Notes
Series Circuit Isolation
Electrical SafetyRunway end lights sit on a constant-current series circuit that can carry several kV across the loop. De-energise and lock out the CCR, then verify zero energy at the base can before opening it or handling connectors.
Airside Work Coordination
OperationalThe runway end row sits at the critical overrun/stop boundary pilots rely on; any work here requires ATC coordination and a NOTAM where fixtures will be dark, with personnel and vehicles kept clear of the runway strip.
Base Can Seal Integrity
MechanicalSince these are inset fittings in a frangibility-sensitive zone, confirm the base can lid and cable gland reseal fully watertight after any work, preventing water ingress and jet-blast debris from reaching the connector.
Hot Lamp / Housing Contact
Personnel SafetyAllow the fixture housing and lamp/LED module to cool before handling after an active period; incandescent units retain significant heat and can cause burns during lens or lamp replacement.
FOD Control at the Base Can
OperationalKeep tools, fasteners, and gaskets accounted for at all times when the base can is open, and secure or remove any loose material before closing out, since this zone sees direct jet-blast and reverse-thrust airflow.
Insulation Test Before Re-Energisation
Electrical SafetyAfter any cable, connector, or transformer work, megger test the affected series loop before restoring power, since a residual fault at re-energisation can trip the CCR or darken the whole loop.
Restore to Compliant State
ComplianceDo not leave a fixture dark, misaligned, or at reduced intensity after maintenance; verify beam orientation toward the approach and photometric conformance before closing out and cancelling the associated NOTAM.
Engineering & Expert Notes
Aim Verification Against the Centreline Survey
OpticalBecause the end row is uni-directional toward the approach, a fixture that's rotated even a few degrees during base-can reinstatement can pass a walk-by check but read weak or dark from the air. Re-check beam orientation against the centreline survey after any base can disturbance, not just at initial setting-out.
Jet-Blast and Reverse-Thrust Debris at the Connector
DurabilityThe end row sits in the zone that takes direct reverse-thrust airflow on landing rollout, which drives more grit and moisture past a marginal base-can seal than a mid-runway edge fixture ever sees. Treat lid gasket and gland condition here as a shorter-interval check item, not the same interval used elsewhere on the field.
Transformer Load Matching on LED Retrofit
RetrofitAn isolating transformer sized for the legacy incandescent lamp is oversized for most LED end-light retrofits; leaving it in place invites early transformer failure and nuisance loop-current faults. Re-select VA rating to the actual LED draw rather than reusing the existing unit by default.
Trend Loop Insulation Readings
TroubleshootingMoisture ingress at the L-823 connector in this zone tends to show up first as a slow drift in loop insulation resistance rather than a sudden hard fault. Logging megger readings across maintenance cycles catches a failing splice before it darkens the loop.
Displaced Threshold Coordination
DesignWhere the runway end and a displaced threshold don't coincide, confirm the end row, threshold row, and edge-light circuits are coordinated so the three read as one continuous boundary to the pilot — an end row set only to the pavement edge without cross-checking the displaced threshold row can create a confusing double boundary at night.
Standing Water Around the Transformer Pit
CivilThe end-of-runway grade often collects more runoff than the main runway length, so a marginal drainage path around the secondary base can shows up here as chronic loop-fault callouts long before the fixture itself fails. Verify the weep/drainage detail at this base can specifically, not just at typical mid-field locations.
Frequently Asked Questions
Short answers about the Runway End Light: what it is, how it works, typical specifications, standards, maintenance and common faults.
Q1What is a Runway End Light?
A Runway End Light is a red light fixture installed at the end of a runway. These lights are arranged in a single row extending across the full runway width, with the number of fixtures set by that width (spacing must not exceed 3 m, per ICAO Annex 14 / FAA AC 150/5345-46), and are uni-directional, projecting light only in the approach direction.
Q2What is the purpose of a Runway End Light?
The runway end light exists to give a pilot an unmistakable, unambiguous cue that usable runway is running out, so the decision to land, stop, or go around can be made with confidence rather than guesswork. Because the fixture is uni-directional and only visible to traffic approaching from the runway side, it cannot be mistaken for a threshold or edge light from the landing direction, and its red colour is reserved exclusively for this "end of pavement" warning across the entire airfield lighting system.
Q3Where is a Runway End Light used and installed?
Installed at the end of all paved runways that support night operations. The lights extend as a single row across the full runway width, on a line at right angles to the centreline, with spacing between adjacent lights not exceeding 3 metres; the outermost lights sit on, or up to about 3 metres outside, the runway edge to match the runway edge light line. Runway end lights are used on both precision and non-precision runways, and are also installed at the end of displaced thresholds where applicable. They work in conjunction with threshold lights to clearly define the runway limits.
Q4How does a Runway End Light work?
Each runway end light is powered from the series circuit via an isolating transformer. The light projects a narrow, uni-directional beam towards the approaching aircraft, using a precision optical system with a reflector and prism. The red colour is achieved through a red filter or dichroic coating. The intensity is controlled by the CCR's current steps, with higher intensities used during low visibility operations. The lights are typically flush-mounted (inset) in the pavement, though elevated versions may be used in some configurations.
Q5What are the typical technical parameters of a Runway End Light?
Typical values are — Light Source: LED array or 45W / 65W halogen; Colour: Red (uni-directional, approach side); Intensity Steps: 5-step (2.8A – 6.6A) CCR controlled; Beam Pattern: Uni-directional (3° vertical x 6° horizontal); Spacing: ≤ 3 metres across runway width; Mounting Type: Flush-mounted (inset) or elevated; Isolating Transformer: 45W / 65W (6.6A series circuit); Protection Class: IP67 / IP68 (submersible).
Q6What are the electrical requirements for a Runway End Light?
Typical requirements are — Circuit Type: Series circuit, constant current (CCR fed); Rated Series Current: 6.6A (5-step: 2.8A / 3.4A / 4.1A / 5.2A / 6.6A); Isolation: Via dedicated isolating transformer (45W/65W), not directly connected to series loop; Transformer Secondary: Matched to fixture wattage; sized to series circuit rating; Cable Type: L-824 single-conductor, direct-burial rated, 5kV or 600V per circuit design; Connector: L-823 primary connector, submersible-rated splice; Insulation Resistance: ≥ 50 MΩ (megger test, cable-to-ground); Earthing/Grounding: Fixture body and base can bonded to airfield earth grid.
Q7What photometric requirements apply to a Runway End Light?
Typical requirements are — Main Beam Intensity (100%): ≥ 2,000 cd (red) per ICAO Annex 14 / IEC 61827; Intensity Steps (5-step): 100% / 30% / 10% / 3% / 1% of rated peak intensity; Vertical Beam Spread: Main beam 2°–15° above horizontal (peak ~3°–4°), uni-directional; Horizontal Beam Spread: ± 5° to ± 7.5° either side of runway centreline plane; Isocandela Distribution: Per ICAO Annex 14 Attachment A / FAA AC 150/5345-46 figures; Chromaticity (Red): Within ICAO Annex 14 red boundary (CIE coordinates); Directionality: Visible from the approach side only; opaque/baffled to the departure side.
Q8Which standards apply to a Runway End Light?
The main references are ICAO Annex 14 — Runway end light colour, spacing, and photometric requirements; FAA AC 150/5345-46 — Specification for runway end lights; IEC 61827 — Electrical and photometric performance for AGL luminaires; FAA AC 150/5345-53 — Airport Lighting Equipment Certification Program. Always verify the current edition and your aerodrome's approved requirements.
Q9How often should a Runway End Light be inspected and maintained?
Typical maintenance tasks and intervals are: Photometric Intensity Check (annual); Red Filter & Lens Cleaning (quarterly); Seal & Gasket Inspection (annual); Frangible Coupling Check (annual); Insulation Resistance Test (annual); Alignment & Levelling (semi-annual); Cable & Connector Inspection (annual); Housing & Base Can Inspection (annual). Your airport's approved maintenance programme takes precedence.
Q10How do I troubleshoot common Runway End Light faults?
Common symptoms covered are: Single Fixture Dark, Rest of Circuit Normal; Entire Series Circuit Dark / CCR Will Not Regulate; CCR Trips on Overcurrent or Ground Fault; Red Colour Appears Faded, Pink, or Orange; Reduced or Uneven Light Output; Fixture Leaning, Loose, or Misaligned. For example, for "Single Fixture Dark, Rest of Circuit Normal": Likely Cause: Failed lamp/LED module, or an open isolating transformer (failed primary link or blown secondary winding) feeding that fixture. Diagnostic Steps: Confirm series loop continuity through the fixture's transformer primary; megger the transformer; check secondary voltage at the connector with the CCR energised. Corrective Action: Replace the lamp/LED module if the transformer checks healthy; otherwise swap the isolating transformer and re-seal the L-823 connectors before backfill.
Related Components
Go Beyond the Component. Understand the Complete AGL System.
You have explored the component. Now understand how it works within the complete Airfield Ground Lighting system.
Learn AGL from fundamentals to design, installation, testing, photometry, commissioning, maintenance and troubleshooting through structured technical training at Precision AGL Academy.
Build practical knowledge. Understand the circuit. Read the standards. Troubleshoot with confidence.
Your next step in AGL starts here.
Need expert guidance on runway end light selection or installation?
Precision AGL Academy provides advice on colour requirements, spacing, and field testing of runway end AGL fixtures.
Follow the Academy
Important Notice, Disclaimer & Limitation of Liability
Please read before relying on any content on this page.
- Purpose and intended users. This page on Runway End Light is an independent educational and informational reference for competent, suitably trained and authorised airfield ground lighting (AGL) and aerodrome electrical personnel. It is not professional engineering, legal or regulatory advice, and using it does not create any professional or client relationship.
- Safety. Work on series circuits, constant current regulators (CCRs), isolating transformers, cables, connectors and lighting equipment can be fatal. Always apply the aerodrome’s permit-to-work and isolation/LOTO procedures, prove dead, use correctly rated instruments and PPE, and follow the manufacturer’s instructions. Nothing here authorises work on live equipment or the bypassing of any safety device or interlock.
- Aviation operations. Nothing here authorises installation, modification, energisation, adjustment, return to service, a change of operating category (CAT I/II/III), a NOTAM or any aerodrome certification or approval decision. These rest with the aerodrome operator, the air navigation service provider and the competent regulator.
- Specifications, ratings and typical values. Descriptions, parameters, ratings, dimensions, photometric values, wattages, service lives, maintenance tasks and intervals, failure modes, certifications (for example CE, FCC, UL or IEC marks) and part or type designations are general, typical and indicative. They may not match any particular product, make, model or version, and they are not a datasheet, design, specification, selection, sizing, procurement or acceptance criterion. The manufacturer’s current documents, the approved design and the project specification prevail.
- Standards and regulations. References to ICAO, FAA, IEC, IEEE, ISO, BIS, DGCA and other standards are paraphrased summaries for orientation only. They may be incomplete or out of date, and standards are revised from time to time. Consult the current official editions. Following this content does not guarantee compliance with any law, standard or regulatory approval, and the regulator’s requirements always prevail.
- No warranty. Content is provided “as is” and “as available”, without warranty of any kind, express or implied, including accuracy, completeness, currency or fitness for a particular purpose. Real installations differ in design, equipment make and model, age and condition.
- Limitation of liability. To the fullest extent permitted by applicable law, Precision AGL Academy, Precision AGL Solutions and their owners, authors and contributors are not liable for any injury, death, loss, damage, downtime, penalty or regulatory consequence, whether direct or indirect, arising from the use of, reliance on, or inability to use this content. Nothing in this notice excludes or limits any liability that cannot lawfully be excluded or limited.
- Independence, brands and no endorsement. This is an independent publication. It is not affiliated with, sponsored by or endorsed by ICAO, the FAA, the IEC, DGCA, AAI, any airport, regulator, supplier or equipment manufacturer. Third-party names, product designations, standard designations and trademarks (including Megger®, Siemens, Eaton, Crouse-Hinds, ADB SAFEGATE, Fluke, ABB and Honeywell) belong to their respective owners and are used only for identification and description. Mention of a brand, product or supplier is not a recommendation, and we do not sell, supply or quote for any component described.
- Images and third-party content. Images and illustrations are shown to help identify the type of component. They may show products of various manufacturers, may not depict the exact item described, and are not a statement about any product’s quality, approval or performance. Copyright and trademarks in third-party images, logos and photographs belong to their respective owners and are not claimed as ours. If you are a rights holder and want an image removed, replaced or credited, email precisionaglsolutions@gmail.com with the page address and we will act promptly.
- Training and services. Mentions of training, courses, consultation, advice, selection, installation, calibration or other support, including the “Learn…Certify” pathway, describe learning stages and are not an offer, quotation, tender or promise of any result. Contacting us or our replying creates no engagement or duty of care; an engagement exists only under a written agreement. We are not a regulator or certification body, and completing any course or reading this content is not a certification, accreditation or authorisation to work on any aerodrome.
- Copyright, privacy and corrections. © 2026 Precision AGL Academy. All rights reserved. Text, structure, compilations and diagrams may be viewed for personal reference and internal training only; any other copying, republication or commercial use needs our written permission. If you email, telephone or message us, we use your details only to respond and handle your matter, in line with applicable Indian law including the Digital Personal Data Protection Act, 2023; please do not send confidential or security-sensitive information. To display this page your browser requests fonts, icons and images from third-party servers, which receive your IP address and browser details under their own policies. Content is reviewed periodically with no obligation to update. To report an error, safety concern or rights issue, write to precisionaglsolutions@gmail.com.