Taxiway Edge Omni Fixture
A versatile taxiway edge lighting fixture that provides 360-degree visibility, ensuring pilots can clearly identify taxiway boundaries from any approach angle or position. The omni-directional beam pattern is particularly valuable at intersections, curves, and apron areas where aircraft may approach from multiple directions, enhancing safety and situational awareness during ground movement.
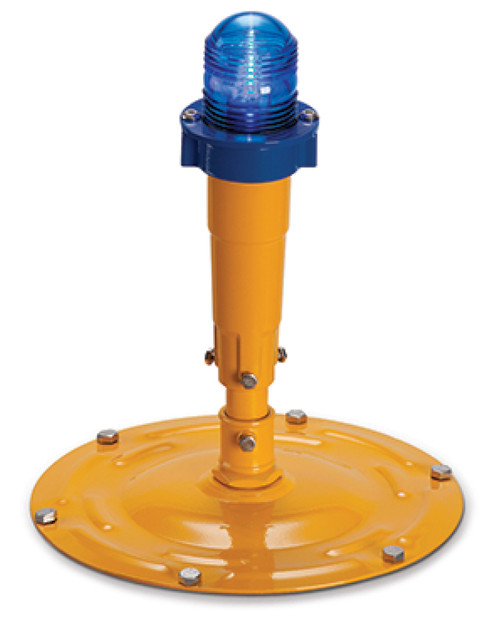
Image disclaimer: For identification and illustration only. It may show a product by another manufacturer and may not depict the exact item described; it is not a statement of any product’s quality, approval or performance. Third-party image and trademark rights belong to their owners. See full notice.
What Is It?
A Taxiway Edge Omni Fixture is a versatile taxiway edge lighting fixture that provides 360-degree visibility, ensuring pilots can clearly identify taxiway boundaries from any approach angle or position. The omni-directional beam pattern is particularly valuable at intersections, curves, and apron areas where aircraft may approach from multiple directions, enhancing safety and situational awareness during ground movement. Unlike directional edge lights that project light primarily along the taxiway axis, omni-directional fixtures emit light uniformly in all directions, providing consistent visibility regardless of the aircraft's position or heading.
Purpose & Function
The taxiway edge omni fixture's purpose is to maintain unambiguous edge definition at exactly the locations — intersections, curves, apron areas — where a directional edge light's narrower beam would leave an aircraft approaching from an unexpected angle without a clear boundary reference. Because ground movement at these locations is inherently multi-directional, unlike the straightforward, single-axis travel along a taxiway segment, the fixture's 360° beam ensures the edge remains visible and interpretable regardless of which direction the aircraft is actually heading, preserving the same reliable blue-edge cue pilots depend on everywhere else on the taxiway network.
Where Is It Used?
Taxiway edge omni fixtures are installed in areas where 360-degree visibility is beneficial or required. They are used on:
- Taxiway intersections where aircraft approach from multiple directions
- Taxiway curves where enhanced visibility from all angles is beneficial
- Apron areas where aircraft manoeuvre in various directions
- Holding bays and parking positions where 360° situational awareness is required
- Low visibility operations where consistent edge definition is critical
- Military airfields with complex ground movement patterns
Installation & Location
Fixtures are installed at the specific points along the taxiway edge where omnidirectional coverage is needed — intersections, curves, apron entries, holding bays — generally flush-mounted (inset) to match the surrounding standard edge lights and avoid introducing a protrusion at what are often higher-traffic locations. Positioning is set out relative to the taxiway's surveyed edge line in the same way as directional edge fixtures, with spacing adjusted locally so the omnidirectional units integrate into the standard edge lighting run without creating unusually bright or dark sections. Because the omnidirectional beam pattern serves aircraft approaching from multiple headings, siting also accounts for sightlines from each of those directions, confirming the fixture isn't shadowed by adjacent signage, other fixtures, or pavement markings from any of the angles it's meant to serve. Power and control cabling ties into the same taxiway edge circuit serving the surrounding standard fixtures, so the omnidirectional units switch and dim in step with the rest of the edge lighting run.
How Does It Work?
Taxiway edge omni fixtures operate using specialised optical designs that provide uniform 360° illumination:
- Optical Design: These fixtures use specialised reflectors, prisms, or LED arrays that distribute light uniformly in all directions (360° horizontal coverage), with a carefully controlled vertical beam angle (typically 3° to 6° above horizontal).
- Light Source: Utilizes blue LED arrays or blue-filtered halogen lamps. The distinctive blue colour is universally recognized as a taxiway edge indicator.
- Beam Pattern: The omni-directional pattern ensures that the fixture is visible to pilots from any position around the taxiway, providing consistent edge definition.
- Mounting: Available in both elevated (on frangible poles) and inset (flush-mounted) configurations, depending on the installation requirements.
- Intensity Control: CCR-controlled intensity with 3 to 5 steps, typically operating at lower current levels (2.8A – 5.2A) to provide adequate but not distracting illumination.
System Architecture & Control Logic
Taxiway edge omni fixtures are controlled exactly like runway edge lights — loop-level, via a series circuit and a dedicated CCR — but the loop is a separate one from the runway edge, centreline, and stop bar circuits, so taxiway edge intensity can be set to the lower steps (2.8A–5.2A) appropriate for ground movement without touching runway-side lighting. The ALCMS or ATC selects the taxiway edge circuit's intensity step to match prevailing visibility, the CCR drives every fixture on the loop to that current simultaneously, and each fixture's own isolating transformer taps the loop current locally. As with any series-circuit fixture, there is no individual on/off or dimming control at the fixture — the omni-directional optics change what a pilot sees, not how the fixture is commanded. Fault detection follows the same loop-voltage principle as the rest of the AGL system: an open circuit anywhere on the taxiway edge loop raises loop voltage at the CCR, reported as a circuit-level fault requiring a field check to localise.
ALCMS / ATC → Taxiway Edge CCR → Series Circuit Loop → Isolating Transformer → Omni Fixture (with loop-level feedback)
Circuit & Beam Overview
CCR
Constant Current Regulator drives the series circuit
Isolating Transformer
Couples the fixture safely into the series loop
Omni Fixture
Blue LED array with reflectors/prisms for 360° distribution
360° Beam Projected — Visible From Any Approach Angle
3°–6° vertical beam angle, full horizontal coverage around the fixture
Physical Construction
What sets this fixture apart mechanically is its optic, not its housing: a blue LED array or filtered 15W–45W halogen lamp sits behind a convex or multi-faceted prism engineered to spread light through a full 360° horizontal arc rather than the narrow beam a directional edge light uses, while still holding a 3°–6° vertical cutoff above horizontal. The body is a die-cast aluminium shell, anodised or powder-coated against fuel and de-icing fluid exposure, gasket-sealed at the prism joint to reach its IP67/IP68 rating. Elevated units mount on a frangible coupling seated in an L-867 base can, standing 300–500 mm above grade so the omnidirectional beam clears the immediate surroundings; inset units instead seat flush in an L-868 base can rated for aircraft wheel loading, trading beam clearance for zero above-ground profile. Either way, internal wiring terminates at sealed L-823 splice connectors feeding a 15W–45W isolating transformer housed nearby.
Technical Parameters
| Parameter | Typical Value |
|---|---|
| Light Source | Blue LED array or 15W – 45W halogen with blue filter |
| Colour | Blue (standard taxiway edge indicator) |
| Beam Pattern | Omnidirectional (360° horizontal coverage) |
| Vertical Beam | Typically 3° to 6° above horizontal |
| Luminous Intensity | 100 – 1,000 candela (depending on setting) |
| Intensity Steps | 3 to 5-step (2.8A – 5.2A) CCR controlled |
| Mounting Type | Elevated (frangible) or Inset (flush) |
| Elevated Mounting Height | 300 – 500 mm above ground |
| Load Capacity (inset) | 100,000 kg (220,000 lbs) wheel load |
| Spacing | 15 – 30m (50 – 100ft) along taxiway edges |
| Isolating Transformer | 15W – 45W (6.6A series circuit) |
| Protection Class | IP67 / IP68 (submersible) |
| Operating Temperature | -40°C to +55°C |
Electrical Requirements
| Requirement | Typical Value |
|---|---|
| Circuit Type | Series circuit, constant current (CCR fed) |
| Rated Series Current | 6.6A (5-step: 2.8A / 3.4A / 4.1A / 5.2A / 6.6A) |
| Isolation | Via dedicated isolating transformer (15W–45W) per unit |
| Transformer Secondary | Matched to fixture wattage; sized to series circuit rating |
| Cable Type | L-824 single-conductor, direct-burial rated, 5kV or 600V per circuit design |
| Connector | L-823 primary connector, submersible-rated splice |
| Insulation Resistance | ≥ 50 MΩ (megger test, cable-to-ground) |
| Earthing/Grounding | Fixture body and base can bonded to airfield earth grid |
| Fault Protection | CCR-level ground fault and open-circuit detection |
| Power Source | CCR output, regulated per ICAO/FAA intensity step schedule |
Photometric Requirements
| Parameter | Typical Value |
|---|---|
| Main Beam Intensity | 100 – 1,000 cd (blue) per ICAO Annex 14 / FAA AC 150/5345-46 |
| Intensity Steps (3–5 step) | 100% / 30% / 10% / 3% / 1% of rated peak intensity |
| Vertical Beam Spread | Main beam 2°–10° above horizontal (peak ~3°–4°) |
| Horizontal Beam Spread | Omnidirectional (360°) full-circle coverage |
| Isocandela Distribution | Per ICAO Annex 14 Attachment A / FAA AC 150/5345-46 taxiway edge figures |
| Chromaticity (Blue) | Within ICAO Annex 14 blue boundary (CIE coordinates) |
| Maintenance Factor | ≥ 50% of new-fixture intensity before replacement/cleaning is due |
| Test Method | Mobile photometric van/goniophotometer or fixed test bench per fixture |
Applicable Standards
ICAO Annex 14
Taxiway edge light colour, spacing, and intensity requirements
FAA AC 150/5345-46
Specification for Runway, Taxiway, Heliport, and Vertiport Light Fixtures — covers this fixture's general photometric and electrical requirements
IEC 61822
Constant current regulators and monitoring device for the series circuit feeding this fixture
IEC 61821
Maintenance requirements for the AGL constant-current series circuit supplying this fixture
Installation Requirements
Base Can Excavation & Grade
CivilExcavate and set the flush-mounted (inset) base can to match the surrounding standard edge lights, holding it flush with the pavement so no protrusion is introduced at these higher-traffic locations.
Edge-Line Set-out at Key Points
CivilSet out fixture positions relative to the taxiway's surveyed edge line at the specific points needing omnidirectional coverage — intersections, curves, apron entries, holding bays — adjusting local spacing so the units integrate into the standard edge run.
Multi-Direction Sightline Check
MechanicalConfirm the fixture is not shadowed by adjacent signage, other fixtures, or pavement markings from any of the multiple approach headings the omnidirectional beam is meant to serve.
Duct & Cable Route
ElectricalLay the series circuit duct/trench to design depth, tying into the same taxiway edge circuit serving the surrounding standard fixtures.
L-823 Connector Termination
ElectricalTerminate and seal the primary connector per manufacturer procedure, keeping the splice submersible-rated before backfill.
Isolating Transformer Matching
ElectricalConfirm the isolating transformer wattage matches the fixture and the series circuit's rated current step before connection.
Load-Rated Housing Seating
MechanicalSeat the fixture housing fully home in the base can and confirm it sits flush and level to carry aircraft wheel loading at these high-traffic points.
Pre-Energisation Sign-off
DocumentationRecord base can position, cable route, connector seal, and sightline check results as-built before backfill.
Testing & Commissioning
Insulation Resistance (Megger) Test
Pre-EnergisationMegger-test the isolating transformer and series loop before the circuit is energised, confirming insulation resistance clears the acceptable minimum ahead of backfill.
Loop Continuity & Resistance Test
Pre-EnergisationVerify series loop continuity end to end and record total loop resistance, ruling out open circuits or high-resistance splices before first energisation.
Primary/Secondary Voltage Verification
EnergisationWith the CCR energised, confirm secondary voltage at the L-823 connector matches the transformer's rated ratio at the commissioned current step.
CCR Brightness Step Response
EnergisationCycle the CCR through every intensity step and confirm the fixture responds correctly at each, ruling out marginal transformers or loose connections.
360° Beam Distribution Verification
Final AcceptanceConfirm the fixture emits uniformly through the full horizontal arc with no dark sectors, checking output at multiple azimuth angles around the fixture.
Photometric Commissioning Test
Final AcceptanceMeasure beam intensity, colour, and vertical cutoff with a calibrated photometer against ICAO/FAA commissioning tolerances prior to operational handover.
Frangibility / Base Can Verification
Pre-EnergisationConfirm the frangible coupling (elevated units) or base can depth (inset units) meet as-built tolerances before the site is finally backfilled.
Documentation & As-Built Sign-off
Final AcceptanceRecord insulation, continuity, voltage, and photometric readings alongside as-built position in the commissioning dossier for handover.
Inspection & Maintenance
Photometric Output Check
AnnualTest light distribution around the full 360° to catch uneven output or overall reduction from optical degradation.
360° Lens Cleaning
QuarterlyClean all lens surfaces of dust, debris, and atmospheric contaminants, since omni-directional fixtures accumulate buildup on every face.
Blue LED / Filter Inspection
AnnualCheck for colour shift or output reduction in the blue light source and filter, replacing components as needed.
Alignment & Mounting Check
Semi-annualVerify the fixture mount remains level and secure so the omni-directional pattern stays correctly projected.
Housing & Seal Inspection
AnnualCheck the housing and seals for weather damage that could accelerate optical degradation.
Common Field Issues
Optical Degradation
The omni-directional optical system is complex and can degrade over time due to UV exposure, thermal stress, and environmental factors. This can result in uneven light distribution or reduced overall output. Regular photometric testing is essential.
Lens Contamination
Omni-directional fixtures are exposed to dust, debris, and atmospheric contaminants on all surfaces. Regular cleaning with approved solvents and soft brushes is required to maintain the 360° light distribution.
Blue Filter/LED Degradation
Blue light sources and filters are particularly susceptible to UV degradation and thermal stress. Over time, output can decrease or colour can shift. Regular photometric testing and replacement is essential to maintain the distinctive blue colour.
Troubleshooting Guide
Dark Sector in the 360° Beam Pattern
Overall Dim or Uneven 360° Output
Blue Colour Shift or Fade
Fixture Dark
Failure Modes & Root Causes
Localised Optical Degradation
General Lens Contamination
Blue LED/Filter Degradation
LED Driver / Base Can Connection Failure
Safety & Operational Notes
Series Circuit Isolation
Electrical SafetyDe-energise and lock out the CCR feeding the taxiway edge circuit, then verify zero energy at the fixture before opening a base can or handling cable connectors.
Airside Work Coordination
OperationalWork at intersections, curves, or apron areas served by omni fixtures often sits in active ground-movement paths; coordinate with ATC/ground control and raise a NOTAM where the fixture will be dark.
Frangibility Not to Be Defeated
MechanicalWhere the fixture is elevated on a frangible coupling, never substitute a rigid fitting or over-torque it; the coupling must still shear cleanly on vehicle or aircraft contact.
Hot Lamp / Housing Contact
Personnel SafetyAllow the fixture housing and lamp/LED module to cool before handling after an active period, since the housing can retain heat during lens or lamp replacement.
FOD Control at the Base Can
OperationalKeep tools, fasteners, and gaskets accounted for while the base can is open, and secure or remove loose material before reinstating the fixture.
Insulation Test Before Re-Energisation
Electrical SafetyMegger test the affected series loop after any cable, connector, or transformer work, since a residual fault at re-energisation can trip the CCR or damage other fixtures on the same circuit.
PPE & Grounding
Personnel SafetyUse insulated tools and appropriate PPE when working on series-circuit connections, and confirm the fixture and base can are bonded/grounded before reconnecting the loop.
Restore to Compliant State
ComplianceVerify the omni-directional beam is unobstructed and photometrically compliant from all approach angles before closing out the work, since a partial obstruction can defeat the fixture's purpose.
Engineering & Expert Notes
Verify the Full 360°, Not Just the Two Directions of Travel
PhotometricIt's tempting to check output only along the two directions of taxi travel the way you would on a unidirectional fixture, but a chipped or misaligned omnidirectional lens often loses intensity in a narrow arc off-axis that a quick two-direction check will miss, especially at curves and intersections served from multiple angles.
Size the Transformer to the Load, Not the Legacy Lamp
ElectricalReusing an isolating transformer sized for the old incandescent wattage on a much lower-draw LED fixture is a common source of premature transformer failure and nuisance loop trips; re-select VA rating against the actual LED load rather than assuming the existing transformer is "close enough."
Trend Loop Readings, Don't Just Spot-Check
TroubleshootingMoisture ingress at an L-823 connector usually shows up first as a slow drift in loop insulation resistance, not a hard fault. Logging megger readings over successive maintenance cycles catches a failing splice months before it takes the loop down.
Frangible Couplings Age, Even Without Impact
MechanicalWhere the fixture is elevated on a frangible coupling, UV and thermal cycling can shift its shear characteristics over years of service. A coupling that looks visually fine can no longer shear at its rated load, so periodic torque/shear verification belongs in the overhaul cycle, not just the post-impact inspection.
Balance Loops Sharing One CCR
DesignWhere multiple series loops run off a single CCR, unequal loop lengths or lamp counts between loops can produce visibly uneven brightness even though each individual fixture tests within photometric tolerance. Balance loop impedance at the design stage, not after commissioning complaints.
De-Icing Fluid Ages Seals Faster Than UV Alone
DurabilityRepeated exposure to glycol-based de-icing fluid degrades gaskets and lens seals faster than sun and weather alone, especially on units near taxiway/runway intersections that see heavy de-icing traffic. Specify seal materials rated for glycol contact and inspect gasket condition at overhaul, not only at initial install.
Frequently Asked Questions
Short answers about taxiway edge omni fixtures: colour, coverage, mounting, standards and maintenance.
Q1What is a taxiway edge omni fixture?
It is a taxiway edge light with a 360° horizontal beam, so pilots can identify the taxiway boundary from any approach angle or position.
Q2What colour are taxiway edge omni lights?
Blue, the standard taxiway edge colour, using a blue LED array or a blue-filtered halogen lamp.
Q3Where are omnidirectional taxiway edge lights used?
At intersections, curves, apron areas, holding bays and parking positions where aircraft approach from many directions, and in low-visibility operations where consistent edge definition is critical.
Q4How bright is a taxiway edge omni fixture?
Typically 100 to 1,000 cd with a vertical beam of about 3° to 6° above horizontal. It is CCR-controlled in 3 to 5 steps, usually between 2.8 A and 5.2 A.
Q5What is the difference between elevated and inset omni fixtures?
Elevated fixtures mount on frangible poles and suit curves and open areas, while inset fixtures are flush-mounted in the pavement and generally match the surrounding standard fixtures.
Q6Which standards apply to taxiway edge omni fixtures?
The main references are ICAO Annex 14 and FAA AC 150/5345-46, with IEC 61822 for the constant current regulators and IEC 61821 for maintenance of the series circuit. Always verify the current edition.
Q7How often should taxiway edge omni fixtures be maintained?
Typical intervals are an annual 360° photometric check, quarterly cleaning of all lens surfaces, annual blue LED and filter inspection and semi-annual alignment and mounting checks.
Q8What causes a dark sector in an omni fixture?
Localised optical degradation or a cracked or contaminated section of the lens is usually blocking light in one sector. Walk around the fixture to map the dark sector, clean it first and replace the lens or optical assembly if it persists.
Related Components
Go Beyond the Component. Understand the Complete AGL System.
You have explored the component. Now understand how it works within the complete Airfield Ground Lighting system.
Learn AGL from fundamentals to design, installation, testing, photometry, commissioning, maintenance and troubleshooting through structured technical training at Precision AGL Academy.
Build practical knowledge. Understand the circuit. Read the standards. Troubleshoot with confidence.
Your next step in AGL starts here.
Need expert guidance on taxiway edge omni fixture selection or installation?
Precision AGL Academy provides advice on 360° optical performance, positioning, and field testing of omni-directional taxiway edge lighting systems.
Follow the Academy
Important Notice, Disclaimer & Limitation of Liability
Please read before relying on any content on this page.
- Purpose and intended users. This page on Taxiway Edge Omni Fixture is an independent educational and informational reference for competent, suitably trained and authorised airfield ground lighting (AGL) and aerodrome electrical personnel. It is not professional engineering, legal or regulatory advice, and using it does not create any professional or client relationship.
- Safety. Work on series circuits, constant current regulators (CCRs), isolating transformers, cables, connectors and lighting equipment can be fatal. Always apply the aerodrome’s permit-to-work and isolation/LOTO procedures, prove dead, use correctly rated instruments and PPE, and follow the manufacturer’s instructions. Nothing here authorises work on live equipment or the bypassing of any safety device or interlock.
- Aviation operations. Nothing here authorises installation, modification, energisation, adjustment, return to service, a change of operating category (CAT I/II/III), a NOTAM or any aerodrome certification or approval decision. These rest with the aerodrome operator, the air navigation service provider and the competent regulator.
- Specifications, ratings and typical values. Descriptions, parameters, ratings, dimensions, photometric values, wattages, service lives, maintenance tasks and intervals, failure modes, certifications (for example CE, FCC, UL or IEC marks) and part or type designations are general, typical and indicative. They may not match any particular product, make, model or version, and they are not a datasheet, design, specification, selection, sizing, procurement or acceptance criterion. The manufacturer’s current documents, the approved design and the project specification prevail.
- Standards and regulations. References to ICAO, FAA, IEC, IEEE, ISO, BIS, DGCA and other standards are paraphrased summaries for orientation only. They may be incomplete or out of date, and standards are revised from time to time. Consult the current official editions. Following this content does not guarantee compliance with any law, standard or regulatory approval, and the regulator’s requirements always prevail.
- No warranty. Content is provided “as is” and “as available”, without warranty of any kind, express or implied, including accuracy, completeness, currency or fitness for a particular purpose. Real installations differ in design, equipment make and model, age and condition.
- Limitation of liability. To the fullest extent permitted by applicable law, Precision AGL Academy, Precision AGL Solutions and their owners, authors and contributors are not liable for any injury, death, loss, damage, downtime, penalty or regulatory consequence, whether direct or indirect, arising from the use of, reliance on, or inability to use this content. Nothing in this notice excludes or limits any liability that cannot lawfully be excluded or limited.
- Independence, brands and no endorsement. This is an independent publication. It is not affiliated with, sponsored by or endorsed by ICAO, the FAA, the IEC, DGCA, AAI, any airport, regulator, supplier or equipment manufacturer. Third-party names, product designations, standard designations and trademarks (including Megger®, Siemens, Eaton, Crouse-Hinds, ADB SAFEGATE, Fluke, ABB and Honeywell) belong to their respective owners and are used only for identification and description. Mention of a brand, product or supplier is not a recommendation, and we do not sell, supply or quote for any component described.
- Images and third-party content. Images and illustrations are shown to help identify the type of component. They may show products of various manufacturers, may not depict the exact item described, and are not a statement about any product’s quality, approval or performance. Copyright and trademarks in third-party images, logos and photographs belong to their respective owners and are not claimed as ours. If you are a rights holder and want an image removed, replaced or credited, email precisionaglsolutions@gmail.com with the page address and we will act promptly.
- Training and services. Mentions of training, courses, consultation, advice, selection, installation, calibration or other support, including the “Learn…Certify” pathway, describe learning stages and are not an offer, quotation, tender or promise of any result. Contacting us or our replying creates no engagement or duty of care; an engagement exists only under a written agreement. We are not a regulator or certification body, and completing any course or reading this content is not a certification, accreditation or authorisation to work on any aerodrome.
- Copyright, privacy and corrections. © 2026 Precision AGL Academy. All rights reserved. Text, structure, compilations and diagrams may be viewed for personal reference and internal training only; any other copying, republication or commercial use needs our written permission. If you email, telephone or message us, we use your details only to respond and handle your matter, in line with applicable Indian law including the Digital Personal Data Protection Act, 2023; please do not send confidential or security-sensitive information. To display this page your browser requests fonts, icons and images from third-party servers, which receive your IP address and browser details under their own policies. Content is reviewed periodically with no obligation to update. To report an error, safety concern or rights issue, write to precisionaglsolutions@gmail.com.