Taxiway Lead-on Light
A colour-coded taxiway centreline light that guides pilots and vehicle drivers from a runway holding position onto the runway. Lead-on lights follow the taxiway centreline itself as a single in-line row, alternating green and yellow, and are switched on with the ATC clearance to enter or cross the runway as the stop bar extinguishes.
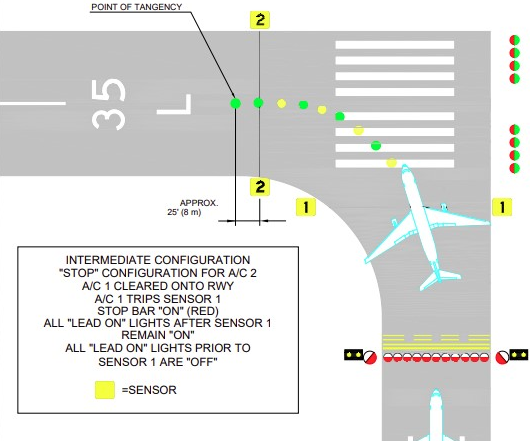
Image disclaimer: For identification and illustration only. It may show a product by another manufacturer and may not depict the exact item described; it is not a statement of any product’s quality, approval or performance. Third-party image and trademark rights belong to their owners. See full notice.
What Is It?
A Taxiway Lead-on Light is a taxiway centreline light, colour-coded and independently switched, that guides pilots and vehicle drivers from a runway holding position onto the runway. Lead-on lights are installed in a single row following the taxiway centreline itself — the same line the aircraft already tracks — rather than as a separate paired fixture either side of it. They carry the same alternating green/yellow colour pattern as lead-off lights, extending from the stop bar toward the runway, so that a pilot who has just been cleared to enter or cross the active runway sees a continuous, unambiguous path forward the moment the stop bar goes dark.
Purpose & Function
The lead-on light's purpose is to resolve exactly the moment where a taxiing aircraft stops being at a holding position and becomes cleared to enter or cross an active runway — a transition where the consequence of confusion is a runway incursion. A controlled stop bar confirms ATC's clearance by going dark, but a dark stop bar on its own tells the pilot nothing about where to go next. The lead-on lights answer that: as the stop bar extinguishes, the taxiway centreline lights immediately ahead illuminate in the same alternating green/yellow pattern used for lead-off, marking that this stretch of centreline lies within the runway or ILS critical area boundary. The colour coding, not a change in fixture layout, is what carries the safety information — it tells the pilot they are now inside the runway environment, rather than relying on the pilot to judge that boundary from signage or memory under workload.
Where Is It Used?
Taxiway lead-on lights are installed on the taxiway centreline stretch between a runway-holding position and the runway itself:
- Runway holding positions served by a controlled stop bar, extending from the stop bar toward the runway
- ILS critical area boundaries where the alternating colour pattern marks the sensitive area
- Low visibility operations (typically below 1,200 ft RVR) where visual confirmation of the runway boundary is essential
- Precision approach runways (CAT II and III) with controlled stop bar installations
- Complex or high-movement airfields using an Advanced Surface Movement Guidance and Control System (A-SMGCS) for selective route switching
Installation & Location
Fixtures are set out in a single row directly along the existing taxiway centreline, using the same inset base can spacing as ordinary taxiway centreline lights, tightened where the centreline curves toward the runway. The lead-on stretch begins at the stop bar and extends toward the runway centreline (commonly around 45–50 m for the first segment on a controlled stop bar installation), with individual fixtures alternating green and yellow lenses along that stretch. Because this segment must be switched independently of the general taxiway circuit — illuminating only once ATC clears the aircraft to enter or cross, in step with the stop bar going dark — it is wired on its own controlled segment rather than the parent taxiway centreline series loop. Cabling runs in duct beneath the pavement back to the isolating transformers and the stop bar/lead-on control cubicle, with setting-out tied to the runway holding position's surveyed location.
How Does It Work?
Taxiway lead-on lights operate as part of the taxiway and runway guidance system:
- Installation: Lead-on lights are installed in a single row along the taxiway centreline itself, spaced as for ordinary taxiway centreline lights (tighter through curves), extending from the stop bar toward the runway.
- Lighting: Each fixture is steady-burning and fixed to either a green or yellow lens, alternating along the row, beginning with green nearest the stop bar — the same colour-coding used for lead-off lights.
- Guidance: The alternating colour pattern tells the pilot the centreline ahead lies within the runway or ILS critical area boundary, confirming the route is clear to proceed once the stop bar extinguishes.
- Integration: Lead-on lights are switched together with the controlled stop bar they serve, and are coordinated with taxiway centreline lights and, where fitted, runway guard lights and A-SMGCS routing logic.
System Architecture & Control Logic
Lead-on lights share the same constant-current series circuit and CCR intensity step as the taxiway centreline lights they extend, so brightness always follows the loop-level step — there is no independent per-fixture dimming. What is distinct is the switching logic layered on top: the lead-on segment is controlled together with its stop bar, either by a dedicated selector relay or, at airports with selective switching, by the ALCMS/A-SMGCS route logic, so the segment stays dark while the stop bar is illuminated and lights only on the specific route ATC has cleared. Fault reporting stays loop-based — a voltage rise at the CCR flags an open circuit or failed transformer somewhere on the loop, but pinpointing it to a specific lead-on fixture still requires sectionalised field testing.
Colour-Coded Guidance Path
CCR
Series circuit, 2.8A – 5.2A
Isolating Transformer
15W – 45W per fixture
Stop Bar / Lead-On Selector
Segment energised only once the stop bar is cleared
Single Row on Centreline
In-line fixtures follow the existing taxiway centreline from the stop bar to the runway
Alternating Green / Yellow
Beginning green nearest the stop bar, matching the lead-off colour pattern
Pilot Confirms Clearance
Illuminated centreline confirms the route into the runway/ILS critical area is active
Physical Construction
Taxiway lead-on light fixtures follow standard flush taxiway centreline light construction: a die-cast aluminium housing set into an L-852 base can, with a hardened glass or polycarbonate lens gasket-sealed to achieve an IP67/IP68 rating against fuel spillage and standing water. Each fixture is fitted with a fixed-colour lens — green or yellow depending on its position in the alternating sequence — rather than a colour-changing element, since the pattern is set once by fixture position and does not need to vary. Internal wiring terminates at sealed L-823 connectors feeding the fixture's isolating transformer within the same base can, and the fixture body is kept low-profile and load-rated to withstand aircraft wheel loading, since the row sits directly on the taxiway centreline through a high-traffic transition zone into the runway. Stainless-steel fasteners and corrosion-resistant coatings are used throughout given this siting.
Technical Parameters
| Parameter | Typical Value |
|---|---|
| Light Source | Green or Yellow LED array (fixed colour per fixture position) |
| Colour | Alternating green/yellow along the row, beginning green nearest the stop bar — marks the runway/ILS critical area boundary |
| Luminous Intensity | 100 – 500 candela (depending on setting) |
| Intensity Steps | 3 to 5-step (2.8A – 5.2A) CCR controlled |
| Beam Pattern | Bi-directional, matching standard taxiway centreline light distribution |
| Spacing | Standard taxiway centreline light spacing, tightened through curves; first segment from the stop bar typically ~45–50 m |
| Mounting Type | Flush-mounted (inset) — standard for taxiway centreline lights; elevated only where flush installation is impractical |
| Load Capacity (inset) | 100,000 kg (220,000 lbs) wheel load |
| Isolating Transformer | 15W – 45W (6.6A series circuit) |
| Protection Class | IP67 / IP68 (submersible) |
| Operating Temperature | -40°C to +55°C |
Electrical Requirements
| Requirement | Typical Value |
|---|---|
| Circuit Type | Series circuit, constant current (CCR fed) |
| Rated Series Current | 6.6A (3–5 step: 2.8A / 3.4A / 4.1A / 5.2A / 6.6A) |
| Isolation | Via dedicated isolating transformer (15W–45W), not directly connected to series loop |
| Cable Type | L-824 single-conductor, direct-burial rated |
| Connector | L-823 primary connector, submersible-rated splice |
| Insulation Resistance | ≥ 50 MΩ (megger test, cable-to-ground) |
| Earthing/Grounding | Fixture body and base can bonded to airfield earth grid |
| Fault Protection | CCR-level ground fault and open-circuit detection |
| Power Source | CCR output, regulated per ICAO/FAA intensity step schedule |
Photometric Requirements
| Parameter | Typical Value |
|---|---|
| Main Beam Intensity (100%) | ≥ 100 cd (green) / ≥ 50 cd (yellow) per ICAO Annex 14 / IEC TS 61827 |
| Intensity Steps (3–5 step) | 100% / 30% / 10% (/ 3% / 1% on 5-step) of rated peak intensity |
| Vertical Beam Spread | Main beam 2°–15° above horizontal (peak ~3°–4°) |
| Horizontal Beam Spread | Bi-directional, matching standard taxiway centreline light coverage |
| Isocandela Distribution | Per ICAO Annex 14 Attachment A / FAA AC 150/5345-46 figures |
| Chromaticity (Green) | Within ICAO Annex 14 green boundary (CIE coordinates) |
| Chromaticity (Yellow) | Within ICAO Annex 14 yellow boundary (CIE coordinates) |
| Maintenance Factor | ≥ 50% of new-fixture intensity before replacement/cleaning is due |
| Intensity Tolerance | ± 25% of rated value at each CCR step (field measurement) |
| Test Method | Mobile photometric van/goniophotometer or fixed test bench per fixture |
Applicable Standards
ICAO Annex 14
Taxiway lead-on light requirements and installation standards
FAA AC 150/5345-46
Specification for Runway, Taxiway, Heliport, and Vertiport Light Fixtures (mechanical/electrical fixture design)
IEC TS 61827
Electrical and photometric performance for AGL luminaires
FAA AC 150/5345-53
Airport Lighting Equipment Certification Program (ALECP) — qualification testing for LED fixtures
Installation Requirements
Fixture Setting-Out on the Centreline
CivilSet out fixtures in a single row along the existing taxiway centreline from the stop bar to the runway, using standard centreline light spacing tightened through any curve.
L-852 Base Can Installation
CivilInstall the standard inset base can recessed into the pavement at each centreline light position, tied to the surveyed holding position and runway centreline.
Independent Segment Wiring
ElectricalWire the lead-on stretch as its own switched segment tied to the stop bar it serves, so it energises only once the stop bar is cleared, independent of the general taxiway centreline circuit.
Cable Route to Transformers
ElectricalRun cabling in duct beneath the pavement back to the isolating transformers and the stop bar/lead-on control cubicle.
Colour Sequence Verification
MechanicalConfirm each fixture's lens colour matches the design sequence (alternating green/yellow, beginning green nearest the stop bar) before backfill.
Pre-Energisation Sign-off
DocumentationRecord fixture setting-out, circuit wiring, and colour sequence as-built before backfill or reinstatement of the base cans.
Testing & Commissioning
Insulation Resistance (Megger) Test
Pre-EnergisationMegger-test the isolating transformer and series loop before the circuit is energised, confirming insulation resistance clears the acceptable minimum ahead of backfill.
Loop Continuity & Resistance Test
Pre-EnergisationVerify series loop continuity end to end and record total loop resistance, ruling out open circuits or high-resistance splices before first energisation.
Primary/Secondary Voltage Verification
EnergisationWith the CCR energised, confirm secondary voltage at the connector matches the transformer's rated ratio at the commissioned current step.
CCR Brightness Step Response
EnergisationCycle the CCR through every intensity step and confirm the fixture responds correctly at each.
Stop Bar / Lead-On Interlock Test
EnergisationConfirm the lead-on segment stays dark while its stop bar is illuminated, and energises correctly when the stop bar is cleared; at airports with selective switching, confirm ALCMS/A-SMGCS activates only the cleared route.
Position & Colour Sequence Verification
Final AcceptanceCheck each fixture's position against the design setting-out and confirm the alternating green/yellow sequence is correct along the full stretch before sign-off.
Photometric Commissioning Test
Final AcceptanceMeasure beam intensity, colour, and beam spread with a calibrated photometer against ICAO/FAA commissioning tolerances prior to operational handover.
Documentation & As-Built Sign-off
Final AcceptanceRecord insulation, continuity, voltage, stop bar/lead-on interlock logic, and photometric readings alongside as-built position in the commissioning dossier for handover.
Inspection & Maintenance
Lens Cleaning
QuarterlyClean the lens of rubber deposits and de-icing fluid residue with approved solvents and soft brushes to maintain light output.
Alignment Check
Semi-annualVerify fixture level and position with a digital level, since pavement settlement or impact can shift an inset fixture out of tolerance.
LED Driver Inspection
AnnualCheck LED drivers for signs of thermal stress or surge damage and replace faulty units to maintain reliability.
Photometric Output Check
AnnualVerify beam intensity remains within spec using a calibrated photometer.
Housing & Seal Inspection
AnnualCheck the fixture housing and seals for water ingress that could damage the LED driver or electronics.
Common Field Issues
Lens Contamination
Lead-on lights are exposed to rubber deposits from aircraft tyres and de-icing fluids. Regular cleaning with approved solvents and soft brushes is required to maintain light output and visibility.
Fixture Settlement or Misalignment
Inset lead-on lights can shift or tilt due to pavement settlement or impact damage, reducing conspicuity along the centreline. Regular level and position checks using a digital level are recommended.
LED Driver Failure
LED drivers in lead-on lights can fail due to thermal stress or power surges. Regular inspection and replacement of faulty drivers is essential to maintain system reliability.
Troubleshooting Guide
Fixture Dim or Discoloured Output
Fixture Out of Position or Level
Fixture Flickers or Cycles On and Off
Fixture Fails to Illuminate
Failure Modes & Root Causes
LED / Lamp Module Failure
Yellow Filter Fade / Chromaticity Shift
Loose or Intermittent Connector
Isolating Transformer Winding Failure
Frangible Coupling Fatigue / Fracture
Lens Contamination
Series Cable Insulation Breakdown
Safety & Operational Notes
Series Circuit Isolation
Electrical SafetyDe-energise and lock out the CCR feeding the taxiway series circuit, then verify zero energy at the fixture before opening a base can or handling cable connectors.
Airside Work Coordination
OperationalCoordinate with ATC/airside operations before working near an active taxiway-to-runway junction, since lead-on lights guide aircraft alignment onto the runway and any outage affects entry procedures.
Frangibility Not to Be Defeated
MechanicalNever substitute the frangible coupling with a rigid fitting or over-torque it during installation or repair; the mounting must still shear cleanly on aircraft impact.
FOD Control at the Base Can
OperationalKeep tools, fasteners, and gaskets accounted for whenever the base can is open, and secure loose material before reinstating the fixture to prevent foreign object debris on the movement area.
Insulation Test Before Re-Energisation
Electrical SafetyAfter cable, connector, or transformer work, megger test the affected series loop before restoring power to avoid tripping the CCR or damaging healthy fixtures on the same circuit.
PPE & Grounding
Personnel SafetyUse insulated tools when working on series-circuit connections and confirm the fixture and base can are bonded/grounded before reconnecting the loop.
Restore to Compliant State
ComplianceVerify correct aim, colour, and photometric output before closing out the work and cancelling any associated NOTAM.
Engineering & Expert Notes
Verify the Transition From the Cockpit Line-of-Sight
DesignThe green-to-yellow handoff at the runway holding position reads differently from a taxiing aircraft's eye height than it does from ground level; where possible, check the transition from a vehicle at approximate cockpit height rather than relying on a walking inspection alone.
Match Intensity Steps to the Runway Edge Circuit
ElectricalLead-on lights are the pilot's last colour cue before crossing onto the runway edge series; if the lead-on fixtures step on a different CCR channel than the runway edge lights, a step mismatch during a brightness change can make the runway look like it's stepping unevenly right at the entry point.
Layout Follows the Entry Geometry, Not a Standard Table
LayoutSkewed or non-perpendicular taxiway-to-runway junctions change the effective spacing an approaching pilot perceives; verify fixture positions against the as-built junction geometry, especially at older aerodromes where the taxiway centreline doesn't meet the runway edge at a clean right angle.
Frangible Couplings Age Even Without Impact
MechanicalUV and thermal cycling can shift the shear characteristics of a composite or aluminium frangible coupling over years of service; a coupling that looks visually fine can no longer shear at its rated load, so build torque/shear verification into the overhaul cycle rather than waiting for a post-impact inspection.
Trend Loop Readings at High-Traffic Junctions
TroubleshootingRunway entry points see more base-can flexing and connector wear from repeated heavy-aircraft turning loads than a straight taxiway run; logging megger readings over successive cycles at these positions catches a developing splice fault well before it takes the loop down.
De-Icing Fluid Concentrates Near Holding Points
DurabilityAircraft often pause briefly at the runway holding position, so glycol-based de-icing fluid tends to pool around lead-on fixtures more than along an open taxiway run; specify glycol-rated seals here and check gasket condition at overhaul rather than only after a reported ingress fault.
Frequently Asked Questions
Short answers about the Taxiway Lead-on Light: what it is, how it works, typical specifications, standards, maintenance and common faults.
Q1What is a Taxiway Lead-on Light?
A Taxiway Lead-on Light is a taxiway centreline light, colour-coded and independently switched, that guides pilots and vehicle drivers from a runway holding position onto the runway. Lead-on lights are installed in a single row following the taxiway centreline itself — the same line the aircraft already tracks — rather than as a separate paired fixture either side of it.
Q2What is the purpose of a Taxiway Lead-on Light?
The lead-on light's purpose is to resolve exactly the moment where a taxiing aircraft stops being at a holding position and becomes cleared to enter or cross an active runway — a transition where the consequence of confusion is a runway incursion. A controlled stop bar confirms ATC's clearance by going dark, but a dark stop bar on its own tells the pilot nothing about where to go next.
Q3Where is a Taxiway Lead-on Light used and installed?
Taxiway lead-on lights are installed on the taxiway centreline stretch between a runway-holding position and the runway itself: Runway holding positions served by a controlled stop bar, extending from the stop bar toward the runway ILS critical area boundaries where the alternating colour pattern marks the sensitive area Low visibility operations (typically below 1,200 ft RVR) where visual confirmation of the runway boundary is essential Precision approach runways (CAT II and III) with controlled stop bar installations Complex or high-movement airfields using an Advanced Surface Movement Guidance and Control System (A-SMGCS) for selective route switching.
Q4How does a Taxiway Lead-on Light work?
Taxiway lead-on lights operate as part of the taxiway and runway guidance system: Installation: Lead-on lights are installed in a single row along the taxiway centreline itself, spaced as for ordinary taxiway centreline lights (tighter through curves), extending from the stop bar toward the runway. Lighting: Each fixture is steady-burning and fixed to either a green or yellow lens, alternating along the row, beginning with green nearest the stop bar — the same colour-coding used for lead-off lights.
Q5What are the typical technical parameters of a Taxiway Lead-on Light?
Typical values are — Light Source: Green or Yellow LED array (fixed colour per fixture position); Colour: Alternating green/yellow along the row, beginning green nearest the stop bar — marks the runway/ILS critical area boundary; Luminous Intensity: 100 – 500 candela (depending on setting); Intensity Steps: 3 to 5-step (2.8A – 5.2A) CCR controlled; Beam Pattern: Bi-directional, matching standard taxiway centreline light distribution; Spacing: Standard taxiway centreline light spacing, tightened through curves; first segment from the stop bar typically ~45–50 m.
Q6What are the electrical requirements for a Taxiway Lead-on Light?
Typical requirements are — Circuit Type: Series circuit, constant current (CCR fed); Rated Series Current: 6.6A (3–5 step: 2.8A / 3.4A / 4.1A / 5.2A / 6.6A); Isolation: Via dedicated isolating transformer (15W–45W), not directly connected to series loop; Cable Type: L-824 single-conductor, direct-burial rated; Connector: L-823 primary connector, submersible-rated splice; Insulation Resistance: ≥ 50 MΩ (megger test, cable-to-ground); Earthing/Grounding: Fixture body and base can bonded to airfield earth grid; Fault Protection: CCR-level ground fault and open-circuit detection; Power Source: CCR output, regulated per ICAO/FAA intensity step schedule.
Q7What photometric requirements apply to a Taxiway Lead-on Light?
Typical requirements are — Main Beam Intensity (100%): ≥ 100 cd (green) / ≥ 50 cd (yellow) per ICAO Annex 14 / IEC TS 61827; Intensity Steps (3–5 step): 100% / 30% / 10% (/ 3% / 1% on 5-step) of rated peak intensity; Vertical Beam Spread: Main beam 2°–15° above horizontal (peak ~3°–4°); Horizontal Beam Spread: Bi-directional, matching standard taxiway centreline light coverage; Isocandela Distribution: Per ICAO Annex 14 Attachment A / FAA AC 150/5345-46 figures; Chromaticity (Green): Within ICAO Annex 14 green boundary (CIE coordinates); Chromaticity (Yellow): Within ICAO Annex 14 yellow boundary (CIE coordinates).
Q8Which standards apply to a Taxiway Lead-on Light?
The main references are ICAO Annex 14 — Taxiway lead-on light requirements and installation standards; FAA AC 150/5345-46 — Specification for Runway, Taxiway, Heliport, and Vertiport Light Fixtures (mechanical/electrical fixture design); IEC TS 61827 — Electrical and photometric performance for AGL luminaires; FAA AC 150/5345-53 — Airport Lighting Equipment Certification Program (ALECP) — qualification testing for LED fixtures. Always verify the current edition and your aerodrome's approved requirements.
Q9How often should a Taxiway Lead-on Light be inspected and maintained?
Typical maintenance tasks and intervals are: Lens Cleaning (quarterly); Alignment Check (semi-annual); LED Driver Inspection (annual); Photometric Output Check (annual); Housing & Seal Inspection (annual). Your airport's approved maintenance programme takes precedence.
Q10How do I troubleshoot common Taxiway Lead-on Light faults?
Common symptoms covered are: Fixture Dim or Discoloured Output; Fixture Out of Position or Level; Fixture Flickers or Cycles On and Off; Fixture Fails to Illuminate. For example, for "Fixture Dim or Discoloured Output": Likely Cause: Rubber deposits or de-icing fluid residue have contaminated the lens, scattering and reducing the effective light output. Diagnostic Steps: Visually inspect the lens for film or discolouration; take a photometric intensity reading and compare against the expected output for the fixture type. Corrective Action: Clean the lens with approved solvents and a soft brush per the manufacturer's cleaning procedure; re-verify photometric output after cleaning.
Related Components
Go Beyond the Component. Understand the Complete AGL System.
You have explored the component. Now understand how it works within the complete Airfield Ground Lighting system.
Learn AGL from fundamentals to design, installation, testing, photometry, commissioning, maintenance and troubleshooting through structured technical training at Precision AGL Academy.
Build practical knowledge. Understand the circuit. Read the standards. Troubleshoot with confidence.
Your next step in AGL starts here.
Need expert guidance on taxiway lead-on light selection or installation?
Precision AGL Academy provides advice on positioning, alignment, and field testing of taxiway lead-on light systems.
Follow the Academy
Important Notice, Disclaimer & Limitation of Liability
Please read before relying on any content on this page.
- Purpose and intended users. This page on Taxiway Lead-on Light is an independent educational and informational reference for competent, suitably trained and authorised airfield ground lighting (AGL) and aerodrome electrical personnel. It is not professional engineering, legal or regulatory advice, and using it does not create any professional or client relationship.
- Safety. Work on series circuits, constant current regulators (CCRs), isolating transformers, cables, connectors and lighting equipment can be fatal. Always apply the aerodrome’s permit-to-work and isolation/LOTO procedures, prove dead, use correctly rated instruments and PPE, and follow the manufacturer’s instructions. Nothing here authorises work on live equipment or the bypassing of any safety device or interlock.
- Aviation operations. Nothing here authorises installation, modification, energisation, adjustment, return to service, a change of operating category (CAT I/II/III), a NOTAM or any aerodrome certification or approval decision. These rest with the aerodrome operator, the air navigation service provider and the competent regulator.
- Specifications, ratings and typical values. Descriptions, parameters, ratings, dimensions, photometric values, wattages, service lives, maintenance tasks and intervals, failure modes, certifications (for example CE, FCC, UL or IEC marks) and part or type designations are general, typical and indicative. They may not match any particular product, make, model or version, and they are not a datasheet, design, specification, selection, sizing, procurement or acceptance criterion. The manufacturer’s current documents, the approved design and the project specification prevail.
- Standards and regulations. References to ICAO, FAA, IEC, IEEE, ISO, BIS, DGCA and other standards are paraphrased summaries for orientation only. They may be incomplete or out of date, and standards are revised from time to time. Consult the current official editions. Following this content does not guarantee compliance with any law, standard or regulatory approval, and the regulator’s requirements always prevail.
- No warranty. Content is provided “as is” and “as available”, without warranty of any kind, express or implied, including accuracy, completeness, currency or fitness for a particular purpose. Real installations differ in design, equipment make and model, age and condition.
- Limitation of liability. To the fullest extent permitted by applicable law, Precision AGL Academy, Precision AGL Solutions and their owners, authors and contributors are not liable for any injury, death, loss, damage, downtime, penalty or regulatory consequence, whether direct or indirect, arising from the use of, reliance on, or inability to use this content. Nothing in this notice excludes or limits any liability that cannot lawfully be excluded or limited.
- Independence, brands and no endorsement. This is an independent publication. It is not affiliated with, sponsored by or endorsed by ICAO, the FAA, the IEC, DGCA, AAI, any airport, regulator, supplier or equipment manufacturer. Third-party names, product designations, standard designations and trademarks (including Megger®, Siemens, Eaton, Crouse-Hinds, ADB SAFEGATE, Fluke, ABB and Honeywell) belong to their respective owners and are used only for identification and description. Mention of a brand, product or supplier is not a recommendation, and we do not sell, supply or quote for any component described.
- Images and third-party content. Images and illustrations are shown to help identify the type of component. They may show products of various manufacturers, may not depict the exact item described, and are not a statement about any product’s quality, approval or performance. Copyright and trademarks in third-party images, logos and photographs belong to their respective owners and are not claimed as ours. If you are a rights holder and want an image removed, replaced or credited, email precisionaglsolutions@gmail.com with the page address and we will act promptly.
- Training and services. Mentions of training, courses, consultation, advice, selection, installation, calibration or other support, including the “Learn…Certify” pathway, describe learning stages and are not an offer, quotation, tender or promise of any result. Contacting us or our replying creates no engagement or duty of care; an engagement exists only under a written agreement. We are not a regulator or certification body, and completing any course or reading this content is not a certification, accreditation or authorisation to work on any aerodrome.
- Copyright, privacy and corrections. © 2026 Precision AGL Academy. All rights reserved. Text, structure, compilations and diagrams may be viewed for personal reference and internal training only; any other copying, republication or commercial use needs our written permission. If you email, telephone or message us, we use your details only to respond and handle your matter, in line with applicable Indian law including the Digital Personal Data Protection Act, 2023; please do not send confidential or security-sensitive information. To display this page your browser requests fonts, icons and images from third-party servers, which receive your IP address and browser details under their own policies. Content is reviewed periodically with no obligation to update. To report an error, safety concern or rights issue, write to precisionaglsolutions@gmail.com.