Approach Crossbar
A row of high‑intensity lights installed perpendicular to the approach centreline at fixed distances from the runway threshold. Approach crossbars provide pilots with critical distance and lateral guidance cues during final approach, helping maintain accurate glide‑slope tracking and centreline alignment in low‑visibility conditions.
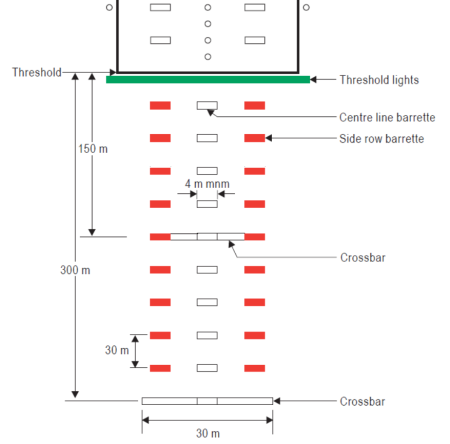
Image disclaimer: For identification and illustration only. It may show a product by another manufacturer and may not depict the exact item described; it is not a statement of any product’s quality, approval or performance. Third-party image and trademark rights belong to their owners. See full notice.
What Is It?
An Approach Crossbar is a row of high‑intensity lights installed perpendicular to the approach centreline, typically consisting of 3 to 5 lights spaced evenly across the approach path. These crossbars are placed at fixed distances from the runway threshold (e.g., 150 m, 300 m, 450 m, 600 m, etc.) as part of the approach lighting system (ALSF‑1, ALSF‑2, MALSF, Calvert, etc.). They provide pilots with a series of bright visual "bars" that help maintain precise lateral alignment, judge distance‑to‑go, and monitor glide‑slope position during the final approach segment.
Approach crossbars are a fundamental component of both precision and medium‑intensity approach lighting systems. They work in conjunction with centreline lights, barrettes, side row bars, and sequenced flashing lights (SFL) to create a comprehensive visual reference for the pilot, particularly critical during low‑visibility (CAT I/II/III) operations where accurate glide‑path and centreline tracking are essential.
Purpose & Function
The approach crossbar's purpose is to give a pilot a repeated, unmistakable reference for both lateral alignment and distance-to-go during the final approach, at exactly the phase of flight where precise positional awareness matters most and visual cues are otherwise sparse. Because each crossbar spans the approach path at a known distance from the threshold, a pilot can read their lateral position from whether the bar appears symmetrical, and their progress along the approach from which crossbars are visible and how far apart they appear — a form of guidance that becomes essential, not just helpful, in the low-visibility CAT I/II/III conditions the approach lighting system exists to support.
Where Is It Used?
Approach crossbars are deployed on precision and non‑precision approach runways and are used in:
- CAT I precision approach runways (ALSF‑1) – providing essential distance and lateral guidance for approaches with 200 ft decision height.
- CAT II and III precision approach runways (ALSF‑2) – critical for low‑visibility operations with decision heights as low as 100 ft or less.
- Medium‑intensity approach lighting systems (MALSF, MALSR) – providing enhanced visual cues for non‑precision runways with higher traffic volumes.
- Calvert I and II systems – a distinctive approach lighting configuration using crossbars as a key visual element.
- Runways with low‑visibility operations (RVR below 800 m) – ensuring pilots have continuous distance and alignment cues.
- Major international airports – where high traffic volumes and adverse weather demand reliable approach guidance.
- Military airfields – requiring all‑weather precision approach capability.
Installation & Location
Crossbars are mounted on the approach lighting structures at their designated stations along the extended runway centreline, set perpendicular to the approach path at the widths and distances specified for the particular ALS configuration (ALSF-1, ALSF-2, MALSF, MALSR, or Calvert). Each crossbar sits on its own frangible support at the height called for by the system design, with the array of individual light units on the bar levelled and aimed during commissioning so the crossbar reads correctly from the cockpit. Cabling is run out from the approach light junction boxes along the structure to each unit, and the crossbar's position is tied into the overall approach lighting survey so its distance from the threshold and offset from the runway centreline extension match the design drawing exactly.
How Does It Work?
Approach crossbars function as a series of visual reference points along the approach path:
- Configuration: Each crossbar is a row of 3‑5 lights, typically spaced 3–5 m apart, installed perpendicular to the approach centreline. Multiple crossbars are placed at specific distances from the threshold (e.g., 150 m, 300 m, 450 m, 600 m, etc.) to provide a regular visual pattern along the approach path.
- Lighting: The lights are high‑intensity white, steady‑burning or flashing, with intensity controlled by the CCR (5‑step). In some systems, crossbars may flash in sequence to create a "running" effect that guides the pilot toward the runway.
- Distance Reference: As the aircraft descends, the pilot sees the crossbars as horizontal lines. The spacing between crossbars provides distance‑to‑go information, helping the pilot judge approach progress and descent rate.
- Lateral Guidance: If the aircraft is off‑centreline, the crossbars will appear asymmetrical, indicating the need for lateral correction. The perpendicular orientation of the crossbars provides a clear reference for maintaining centreline alignment.
- Glide‑Slope Monitoring: By observing the spacing and position of crossbars relative to the aircraft, pilots can assess whether they are on the correct glide slope — appearing too close together may indicate being too high or too low.
- Integration: Approach crossbars are integrated with centreline lights, barrettes, side row bars, and sequenced flashing lights (SFL) to form a comprehensive visual approach system. They are typically positioned at regular intervals along the approach lighting structure.
System Architecture & Control Logic
Approach crossbars are not individually addressable — they sit on a dedicated approach lighting series circuit, kept separate from the runway edge and centreline loops so the ALS can be intensity-stepped on its own schedule. An Airfield Lighting Control and Monitoring System (ALCMS), driven by prevailing RVR, ATC instruction, or pilot-controlled lighting at smaller fields, selects the required brightness step and passes it to the approach lighting CCR, which sets the entire loop to that fixed current (typically 5-step, up to 6.6A). Every crossbar station on that loop — along with the barrettes, side rows, and any sequenced flashers sharing the circuit — burns at the identical step simultaneously; there is no mechanism to brighten or dim one crossbar independently of the rest of the approach lighting array. Fault detection is loop-based: the CCR watches loop voltage against the commanded current, and a voltage rise flags an open-circuit condition — a burnt-out lamp, a failed isolating transformer, or a sheared frangible support beneath one of the crossbar's individual units — as a single approach-lighting-loop fault. The ALCMS reports the fault to the loop, not to a specific crossbar station, so a field walk of the structure is what actually locates the failed unit.
ALCMS / ATC / PCL → Approach Lighting CCR → Series Circuit Loop → Crossbar Station (per fixture) → loop-level feedback
Crossbar Sequence Toward the Threshold
Physical Construction
Each light in a crossbar is a self-contained high-intensity fixture — an LED array or 45W/65W/100W halogen lamp behind a precision optical prism, housed in a die-cast aluminium body that is anodised or powder-coated against jet fuel, de-icing fluid, and UV exposure. Elevated crossbars mount each fixture on a frangible coupling and pole seated in an L-867 base can, so an individual light shears cleanly off on impact rather than transmitting the load along the bar; flush-mounted crossbars instead seat each fixture in an L-868 base can rated for aircraft wheel loading. What makes a crossbar a single component rather than a set of unrelated fixtures is the shared civil layout: all 3–5 lights are set to a common width and spacing, wired back to individual isolating transformers of matched wattage, and aligned so their beams present as one continuous bar rather than a scatter of independent points. Gasket-sealed top caps and O-ring seals on each fixture give the assembly its IP67/IP68 rating, and sealed L-823 splice connectors carry the series circuit between fixtures and back to the primary cable.
Technical Parameters
| Parameter | Typical Value |
|---|---|
| Light Source | LED array or 45W/65W/100W halogen (high intensity) |
| Colour | White (steady or flashing) |
| Luminous Intensity | 10,000–20,000 cd (depending on setting) |
| Intensity Steps | 5‑step (2.8A – 6.6A) CCR controlled |
| Beam Pattern | Unidirectional towards approaching aircraft |
| Crossbar Width | Typically 15–30 m (depending on system) |
| Lights per Crossbar | 3–5 lights (typically 5 in ALSF‑2, 3 in Calvert I) |
| Spacing between Crossbars | As per approach lighting design (e.g., 150 m, 300 m, 450 m, 600 m) |
| Mounting Type | Elevated (on frangible poles) or flush‑mounted |
| Isolating Transformer | 45W / 65W / 100W (6.6A series circuit) per light |
| Protection Class | IP67 / IP68 (submersible) |
Electrical Requirements
| Requirement | Typical Value |
|---|---|
| Circuit Type | Series circuit, constant current (CCR fed), with each light isolated via its own transformer |
| Rated Series Current | 6.6A (5-step), matching the associated CCR |
| Isolating Transformer | 45W / 65W / 100W per light, one per fixture on the crossbar |
| Crossbar Wiring | Individual light feeds run in parallel from the series loop to each fixture position across the crossbar span |
| Cable Type | L-824 single-conductor, direct-burial rated, sized to the approach lighting circuit's voltage class |
| Insulation Resistance | ≥ 50 MΩ (megger test, cable-to-ground) |
| Earthing/Grounding | Crossbar structure and each fixture bonded to the airfield earth grid |
| Fault Protection | CCR-level ground fault and open-circuit detection for the series loop |
Photometric Requirements
| Parameter | Typical Value |
|---|---|
| Main Beam Intensity | ≥ 15,000 cd (white) per ICAO Annex 14 / IEC TS 61827 |
| Intensity Steps (5-step) | 100% / 30% / 10% / 3% / 1% of rated peak intensity, matched across all fixtures on the crossbar |
| Vertical Beam Spread | Main beam 1°–12° above horizontal (peak ~2°–3°) |
| Horizontal Beam Spread | ± 4.5° either side of the runway centreline plane, spanning the full crossbar width |
| Isocandela Distribution | Per ICAO Annex 14 Attachment A / FAA AC 150/5345-46 crossbar figures |
| Chromaticity (White) | Within ICAO Annex 14 white boundary (CIE coordinates) |
| Fixture-to-Fixture Uniformity | Consistent intensity across all lights on the crossbar to present an unbroken bar to the approaching aircraft |
| Test Method | Mobile photometric van/goniophotometer or fixed test bench per lamp head |
Applicable Standards
ICAO Annex 14
Approach crossbar requirements for precision approach lighting systems
FAA AC 150/5345-46
Specification for approach lighting system components
FAA AC 150/5345-56
Approach lighting systems – ALSF‑1 and ALSF‑2 configuration
IEC TS 61827
Characteristics of inset and elevated AGL luminaires
Installation Requirements
Station Setout Along Centreline
CivilPosition each crossbar at its designated station along the extended runway centreline, perpendicular to the approach path at the width and distance specified for the ALS configuration (ALSF-1, ALSF-2, MALSF, MALSR, or Calvert).
Frangible Support Foundation
CivilInstall the frangible support at the height called for by the system design.
Junction Box Cable Route
ElectricalRun cabling from the approach light junction boxes along the structure to each light unit on the bar.
Isolating Transformer Matching
ElectricalConfirm each light's 45W/65W/100W isolating transformer matches the series circuit's rated current step.
Unit-by-Unit Levelling & Aiming
MechanicalLevel and aim the array of individual light units on the bar during commissioning so the crossbar reads correctly from the cockpit.
Survey Position Verification
DocumentationVerify the crossbar's distance from the threshold and offset from the runway centreline extension match the design drawing before energisation.
Pre-Energisation Sign-off
DocumentationRecord crossbar station, cable routes, and transformer ratings as-built before the site is closed.
Testing & Commissioning
Insulation Resistance (Megger) Test
Pre-EnergisationMegger-test the series loop feeding the crossbar before energisation, confirming insulation resistance clears the acceptable minimum ahead of backfill.
Loop Continuity & Light Count Check
Pre-EnergisationVerify series loop continuity through every light in the crossbar and confirm the correct light count (3–5) for the specific approach lighting configuration.
Primary/Secondary Voltage Verification
EnergisationWith the CCR energised, confirm secondary voltage at each fixture's connector matches the transformer's rated ratio at the commissioned current step.
CCR Brightness Step Response
EnergisationCycle the CCR through every intensity step and confirm all lights across the crossbar respond together, ruling out marginal transformers within the bar.
Crossbar Position & Alignment Check
Final AcceptanceConfirm the crossbar sits at its design distance from the runway threshold and that every light is aimed correctly toward the approach path.
Photometric Commissioning Test
Final AcceptanceMeasure beam intensity and spread across the crossbar with a calibrated photometer against ICAO/FAA commissioning tolerances.
Sequencing Compatibility Check
Final AcceptanceWhere the crossbar coexists with a sequenced flasher system, confirm its steady-burning operation does not conflict with the flasher timing pattern.
Documentation & As-Built Sign-off
Final AcceptanceRecord loop resistance, voltage, alignment, and photometric readings alongside as-built position in the commissioning dossier.
Inspection & Maintenance
Alignment & Spacing Survey
AnnualVerify crossbar alignment perpendicular to the centreline and consistent spacing between bars using theodolite or laser tools, especially after pavement work.
Lens Cleaning
QuarterlyClean lenses of jet blast residue, rubber deposits, and de-icing fluid, especially before low-visibility seasons, to maintain light output.
Frangible Coupling Inspection
AnnualInspect elevated crossbar couplings for fatigue from wind loading and thermal cycling, replacing per manufacturer schedule.
Flashing Sequence Test
QuarterlyTest flash timing and synchronisation across crossbars to confirm the running effect remains correctly sequenced.
Photometric Output Check
AnnualVerify beam intensity remains within spec using a calibrated photometer.
Common Field Issues
Precise Alignment and Spacing
Approach crossbars must be installed with exact alignment perpendicular to the centreline and consistent spacing between successive crossbars. Any misalignment or deviation in spacing can create confusing visual cues for pilots. Regular surveys using theodolites or laser alignment tools are essential, especially after pavement resurfacing or maintenance.
Lens Contamination and Light Output
Crossbar lights are exposed to jet blast, rubber deposits, and de‑icing fluids. Contamination can reduce light output and affect the clarity of the visual pattern. Routine cleaning and photometric checks are critical, especially before low‑visibility seasons.
Frangible Coupling Fatigue
Elevated crossbar lights are subject to wind loading and thermal cycling, which can fatigue the frangible couplings. Regular inspection and replacement per manufacturer schedules ensure the lights remain safe and properly positioned.
Flashing Synchronisation Failure
In systems where crossbars flash in sequence, timing errors can occur due to control circuit issues. This can disrupt the "running" effect and confuse pilots. Periodic testing of the flashing sequence and synchronisation is recommended.
Troubleshooting Guide
Visual Pattern Appears Skewed or Confusing to Pilots
Reduced Light Output or Unclear Visual Pattern
Fixture Leaning, Loose, or Misaligned
"Running" Flash Effect Disrupted or Out of Sequence
Failure Modes & Root Causes
Individual Light Unit Failure Within the Crossbar
Crossbar Level / Aim Drift
Frangible Support Fatigue / Impact Damage
Feed Cable / Junction Box Failure to the Whole Crossbar
Series Circuit Insulation Breakdown Along the Structure Run
Safety & Operational Notes
Series Circuit Isolation
Electrical SafetyCrossbar circuits run on a constant-current series loop that can carry several kV. De-energise and lock out the associated CCR, then verify zero energy at the crossbar before opening any fixture or connector.
Elevated Tower & Off-Runway Access
Personnel SafetyCrossbars span the full width of the light bar structure, often on elevated frangible towers over terrain that may be uneven or off the paved movement area; use fall protection when climbing towers and assess ground conditions before positioning vehicles or ladders.
Frangibility Not to Be Defeated
MechanicalNever substitute the frangible coupling or tower base with a rigid fitting or over-torque it during installation or repair; the structure must still break away cleanly on aircraft impact within the runway safety area.
Airside Work Coordination
OperationalA crossbar failure or outage can affect published CAT I/II/III minima; obtain ATC/airside coordination and issue a NOTAM before any crossbar light is taken out of service, and keep personnel and vehicles clear of the approach surface during aircraft operations.
FOD Control Along the Approach
OperationalAccount for tools, fasteners, and hardware at every crossbar worked on, and remove or secure loose material before leaving the site, since debris in the approach area can be ingested or strike an aircraft on short final.
Insulation Test Before Re-Energisation
Electrical SafetyAfter any cable, connector, or transformer work on a crossbar circuit, megger test the affected series loop before restoring power, since a residual fault can trip the CCR or damage healthy fixtures on the same circuit.
Uniformity Across the Bar
ComplianceA crossbar's guidance value depends on all lights across the row reading as a single uniform bar; verify aim and intensity are matched across every light in the crossbar, not just the unit that was serviced.
Restore to Compliant State
ComplianceDo not leave a crossbar light out of aim tolerance or at reduced intensity; verify photometric and positional conformance before closing out the work and cancelling the associated NOTAM.
Engineering & Expert Notes
Crossbar Alignment Is Judged Laterally, Not Just Per-Fixture
VerificationEach fixture on a crossbar can individually test within photometric spec while the bar as a whole reads unevenly if fixture aim or mounting height varies slightly across its width. Check the crossbar's lateral uniformity as a unit, not only fixture-by-fixture compliance.
Crossbar Distance From Threshold Should Be Re-Surveyed After Structural Work
DesignThe crossbar's designed distance from the threshold is a key part of the approach lighting geometry pilots use for distance cueing. After any structural repair, foundation work, or mast replacement, re-survey the crossbar's position rather than assuming reinstallation returned it to the exact original location.
Wind Loading Across a Full-Width Crossbar Structure Compounds
StructuralA crossbar spans multiple fixtures across a structure wider than a single mast; wind loading on the combined structure is not simply the sum of individual fixture loads and should be assessed as a system, particularly for the central support points.
Uniformity Across a Bar Depends on Matched Fixture Age, Not Just Matched Spec
MaintenanceReplacing one fixture on a crossbar with new stock next to older, slightly lumen-depreciated neighbours can create a visible brightness step across the bar even though the new fixture is correctly specified. Consider replacing crossbar fixtures as a matched set where lumen depreciation has diverged significantly.
Snow and Ice Loading Concentrates on the Horizontal Structure
SeasonalThe horizontal structure of a crossbar accumulates snow and ice differently than a single vertical mast, adding load in a location the original point-fixture design basis may not have anticipated. Confirm structural design accounts for accumulation specific to the crossbar geometry in icing-prone climates.
Verify Crossbar Position Against the Full Approach Layout, Not Just Local Tolerance
VerificationA crossbar can be internally well-aligned and still sit slightly off its designed station along the approach if the original survey reference point has shifted or was mismeasured. Periodically re-verify crossbar position against the full approach lighting layout, not only against its own local alignment.
Frequently Asked Questions
Short answers about the Approach Crossbar: what it is, how it works, typical specifications, standards, maintenance and common faults.
Q1What is an Approach Crossbar?
An Approach Crossbar is a row of high‑intensity lights installed perpendicular to the approach centreline, typically consisting of 3 to 5 lights spaced evenly across the approach path. These crossbars are placed at fixed distances from the runway threshold (e.g., 150 m, 300 m, 450 m, 600 m, etc.) as part of the approach lighting system (ALSF‑1, ALSF‑2, MALSF, Calvert, etc.).
Q2What is the purpose of an Approach Crossbar?
The approach crossbar's purpose is to give a pilot a repeated, unmistakable reference for both lateral alignment and distance-to-go during the final approach, at exactly the phase of flight where precise positional awareness matters most and visual cues are otherwise sparse.
Q3Where is an Approach Crossbar used and installed?
Approach crossbars are deployed on precision and non‑precision approach runways and are used in: CAT I precision approach runways (ALSF‑1) – providing essential distance and lateral guidance for approaches with 200 ft decision height. CAT II and III precision approach runways (ALSF‑2) – critical for low‑visibility operations with decision heights as low as 100 ft or less. Medium‑intensity approach lighting systems (MALSF, MALSR) – providing enhanced visual cues for non‑precision runways with higher traffic volumes.
Q4How does an Approach Crossbar work?
Approach crossbars function as a series of visual reference points along the approach path: Configuration: Each crossbar is a row of 3‑5 lights, typically spaced 3–5 m apart, installed perpendicular to the approach centreline. Multiple crossbars are placed at specific distances from the threshold (e.g., 150 m, 300 m, 450 m, 600 m, etc.) to provide a regular visual pattern along the approach path. Lighting: The lights are high‑intensity white, steady‑burning or flashing, with intensity controlled by the CCR (5‑step).
Q5What are the typical technical parameters of an Approach Crossbar?
Typical values are — Light Source: LED array or 45W/65W/100W halogen (high intensity); Colour: White (steady or flashing); Luminous Intensity: 10,000–20,000 cd (depending on setting); Intensity Steps: 5‑step (2.8A – 6.6A) CCR controlled; Beam Pattern: Unidirectional towards approaching aircraft; Crossbar Width: Typically 15–30 m (depending on system); Lights per Crossbar: 3–5 lights (typically 5 in ALSF‑2, 3 in Calvert I); Spacing between Crossbars: As per approach lighting design (e.g., 150 m, 300 m, 450 m, 600 m); Mounting Type: Elevated (on frangible poles) or flush‑mounted; Isolating Transformer: 45W / 65W / 100W (6.6A series circuit) per light.
Q6What are the electrical requirements for an Approach Crossbar?
Typical requirements are — Circuit Type: Series circuit, constant current (CCR fed), with each light isolated via its own transformer; Rated Series Current: 6.6A (5-step), matching the associated CCR; Isolating Transformer: 45W / 65W / 100W per light, one per fixture on the crossbar; Crossbar Wiring: Individual light feeds run in parallel from the series loop to each fixture position across the crossbar span; Cable Type: L-824 single-conductor, direct-burial rated, sized to the approach lighting circuit's voltage class; Insulation Resistance: ≥ 50 MΩ (megger test, cable-to-ground).
Q7What photometric requirements apply to an Approach Crossbar?
Typical requirements are — Main Beam Intensity: ≥ 15,000 cd (white) per ICAO Annex 14 / IEC TS 61827; Intensity Steps (5-step): 100% / 30% / 10% / 3% / 1% of rated peak intensity, matched across all fixtures on the crossbar; Vertical Beam Spread: Main beam 1°–12° above horizontal (peak ~2°–3°); Horizontal Beam Spread: ± 4.5° either side of the runway centreline plane, spanning the full crossbar width; Isocandela Distribution: Per ICAO Annex 14 Attachment A / FAA AC 150/5345-46 crossbar figures; Chromaticity (White): Within ICAO Annex 14 white boundary (CIE coordinates).
Q8Which standards apply to an Approach Crossbar?
The main references are ICAO Annex 14 — Approach crossbar requirements for precision approach lighting systems; FAA AC 150/5345-46 — Specification for approach lighting system components; FAA AC 150/5345-56 — Approach lighting systems – ALSF‑1 and ALSF‑2 configuration; IEC TS 61827 — Characteristics of inset and elevated AGL luminaires. Always verify the current edition and your aerodrome's approved requirements.
Q9How often should an Approach Crossbar be inspected and maintained?
Typical maintenance tasks and intervals are: Alignment & Spacing Survey (annual); Lens Cleaning (quarterly); Frangible Coupling Inspection (annual); Flashing Sequence Test (quarterly); Photometric Output Check (annual). Your airport's approved maintenance programme takes precedence.
Q10How do I troubleshoot common Approach Crossbar faults?
Common symptoms covered are: Visual Pattern Appears Skewed or Confusing to Pilots; Reduced Light Output or Unclear Visual Pattern; Fixture Leaning, Loose, or Misaligned; "Running" Flash Effect Disrupted or Out of Sequence. For example, for "Visual Pattern Appears Skewed or Confusing to Pilots": Likely Cause: Crossbar alignment perpendicular to the centreline, or the spacing between successive crossbars, has drifted from design specification — often after pavement resurfacing or maintenance nearby. Diagnostic Steps: Conduct a survey using a theodolite or laser alignment tool, checking crossbar alignment and inter-crossbar spacing against the design drawing. Corrective Action: Re-align and re-position crossbars found out of tolerance, and re-survey after any nearby pavement work going forward.
Related Components
Go Beyond the Component. Understand the Complete AGL System.
You have explored the component. Now understand how it works within the complete Airfield Ground Lighting system.
Learn AGL from fundamentals to design, installation, testing, photometry, commissioning, maintenance and troubleshooting through structured technical training at Precision AGL Academy.
Build practical knowledge. Understand the circuit. Read the standards. Troubleshoot with confidence.
Your next step in AGL starts here.
Need expert guidance on Approach Crossbar selection, installation, or maintenance?
Precision AGL Academy provides advice on approach lighting configuration, photometric performance, and field verification of approach crossbars.
Follow the Academy
Important Notice, Disclaimer & Limitation of Liability
Please read before relying on any content on this page.
- Purpose and intended users. This page on Approach Crossbar is an independent educational and informational reference for competent, suitably trained and authorised airfield ground lighting (AGL) and aerodrome electrical personnel. It is not professional engineering, legal or regulatory advice, and using it does not create any professional or client relationship.
- Safety. Work on series circuits, constant current regulators (CCRs), isolating transformers, cables, connectors and lighting equipment can be fatal. Always apply the aerodrome’s permit-to-work and isolation/LOTO procedures, prove dead, use correctly rated instruments and PPE, and follow the manufacturer’s instructions. Nothing here authorises work on live equipment or the bypassing of any safety device or interlock.
- Aviation operations. Nothing here authorises installation, modification, energisation, adjustment, return to service, a change of operating category (CAT I/II/III), a NOTAM or any aerodrome certification or approval decision. These rest with the aerodrome operator, the air navigation service provider and the competent regulator.
- Specifications, ratings and typical values. Descriptions, parameters, ratings, dimensions, photometric values, wattages, service lives, maintenance tasks and intervals, failure modes, certifications (for example CE, FCC, UL or IEC marks) and part or type designations are general, typical and indicative. They may not match any particular product, make, model or version, and they are not a datasheet, design, specification, selection, sizing, procurement or acceptance criterion. The manufacturer’s current documents, the approved design and the project specification prevail.
- Standards and regulations. References to ICAO, FAA, IEC, IEEE, ISO, BIS, DGCA and other standards are paraphrased summaries for orientation only. They may be incomplete or out of date, and standards are revised from time to time. Consult the current official editions. Following this content does not guarantee compliance with any law, standard or regulatory approval, and the regulator’s requirements always prevail.
- No warranty. Content is provided “as is” and “as available”, without warranty of any kind, express or implied, including accuracy, completeness, currency or fitness for a particular purpose. Real installations differ in design, equipment make and model, age and condition.
- Limitation of liability. To the fullest extent permitted by applicable law, Precision AGL Academy, Precision AGL Solutions and their owners, authors and contributors are not liable for any injury, death, loss, damage, downtime, penalty or regulatory consequence, whether direct or indirect, arising from the use of, reliance on, or inability to use this content. Nothing in this notice excludes or limits any liability that cannot lawfully be excluded or limited.
- Independence, brands and no endorsement. This is an independent publication. It is not affiliated with, sponsored by or endorsed by ICAO, the FAA, the IEC, DGCA, AAI, any airport, regulator, supplier or equipment manufacturer. Third-party names, product designations, standard designations and trademarks (including Megger®, Siemens, Eaton, Crouse-Hinds, ADB SAFEGATE, Fluke, ABB and Honeywell) belong to their respective owners and are used only for identification and description. Mention of a brand, product or supplier is not a recommendation, and we do not sell, supply or quote for any component described.
- Images and third-party content. Images and illustrations are shown to help identify the type of component. They may show products of various manufacturers, may not depict the exact item described, and are not a statement about any product’s quality, approval or performance. Copyright and trademarks in third-party images, logos and photographs belong to their respective owners and are not claimed as ours. If you are a rights holder and want an image removed, replaced or credited, email precisionaglsolutions@gmail.com with the page address and we will act promptly.
- Training and services. Mentions of training, courses, consultation, advice, selection, installation, calibration or other support, including the “Learn…Certify” pathway, describe learning stages and are not an offer, quotation, tender or promise of any result. Contacting us or our replying creates no engagement or duty of care; an engagement exists only under a written agreement. We are not a regulator or certification body, and completing any course or reading this content is not a certification, accreditation or authorisation to work on any aerodrome.
- Copyright, privacy and corrections. © 2026 Precision AGL Academy. All rights reserved. Text, structure, compilations and diagrams may be viewed for personal reference and internal training only; any other copying, republication or commercial use needs our written permission. If you email, telephone or message us, we use your details only to respond and handle your matter, in line with applicable Indian law including the Digital Personal Data Protection Act, 2023; please do not send confidential or security-sensitive information. To display this page your browser requests fonts, icons and images from third-party servers, which receive your IP address and browser details under their own policies. Content is reviewed periodically with no obligation to update. To report an error, safety concern or rights issue, write to precisionaglsolutions@gmail.com.